Safe Terraform Pipelines with Azure DevOps
- How Does Terraform Work?
- Building a safe Terraform pipeline
- Review the Plan
- The Big Picture
To use Terraform in Azure DevOps pipelines, we must account for the real-world risks involved with changing infrastructure. You must understand the tools Terraform provides to deal with the associated risk and adapt them to the features offered in Azure DevOps. It is simple to get Terraform automation working when you choose to “turn the safeties off.” Like many DevOps tasks, Terraform automation must follow an evolution from merely making the process work, to making it right, and finally making it fast. This post intends to show how to move from “make it work” to “make it right.”
How Does Terraform Work?
You might already know how Terraform works. Still, it pays to think about how Terraform works when building Azure DevOps pipelines. Terraform manages infrastructure by:
- Tracking infrastructure state in a state file
- Comparing the current state to the desired state expressed by the terraform configuration code
- Creating a plan to update the actual state to match the desired state
- Applying the plan
- Saving off the new state
There are a few ways to tell Terraform to go through these steps. However, with few exceptions, the way you invoke Terraform does not alter this workflow. One way or another, Terraform executes these steps to change infrastructure. There is a simplified workflow/series of commands that hides some complexity, and this perhaps leads to some confusion and bad habits as teams adopt the tool. The simplified workflow is useful for demos and learning Terraform development. A more sophisticated workflow is suitable for operating Terraform in the real world.
Terraform has great documentation, and the getting started guide is no exception. The second step of the guide introduces newcomers to the most simplified Terraform workflow. The simplified Terraform workflow looks like this:
- Write (or copy/clone) some Terraform configuration
- Execute
terraform initto initialize the Terraform project directory - Execute
terraform applyto create/modify infrastructure
This workflow is fine for a total newcomer. When I first started using Terraform, I primarily wanted to learn to write the code to create resources. For me, using (a much older version of) this guide helped keep the focus on learning the HashiCorp Configuration Language (HCL) Terraform uses. Although the workflow was simplified (which I didn’t realize at the time), I still managed to see infrastructure running in the cloud within minutes. It was great.
Great as it was, the getting started guide is not a guide for operating Terraform in the real world. Any attempt to automate the simplified workflow, falls flat at the apply step. In the simplified workflow the apply step is interactive, and interactivity is simply a killer in an automated environment. The usual response to this problem seems to be to ask, “How do we make the apply command non-interactive?” I would argue that this is the wrong question. It’s much better to understand why apply is interactive by default.
I summarized Terraform’s steps for managing infrastructure. In the simplified workflow, Terraform compresses all actions into the single execution of the apply command. When invoking apply with default arguments, Terraform happily runs all the steps up until “creating a plan” and stores the resulting plan in memory. Terraform then shows you the plan and asks you to confirm that you would like to use the plan to make changes to your infrastructure. Terraform’s default safety mechanism is you, the DevOps person who just invoked the command. Terraform cannot review the plan, think it over, and make the right decision about whether the changes are safe. It relies on you for that decision. To apply the plan, you type yes and hit enter, and Terraform begins the actual infrastructure changes.
To run Terraform in a pipeline in the real world, where screwing up your infrastructure has real-world consequences like bankruptcy and unemployment, you must solve for two constraints:
- How do we make
applynon-interactive? - How do we make
applysafe?
I often see the first question answered without consideration for the second. A quick study of the command line switches for apply offers a tempting but dangerous option: the -auto-approve switch. This switch bypasses the prompt to approve the plan and immediately applies the changes! Rumor has it that the Terraform developers only created this switch for demos. Yet this convenience feature is the “solution” many blogs and labs “put into production.” Using it breaks the implicit contract you have with Terraform: you are the safety feature, and you are supposed to review the plan before applying it.
Reviewing the plan is essential. If you don’t inspect the plan, you expose your infrastructure to potentially unwanted changes. You can–and should–practice code reviews for proposed Terraform configuration changes. There are two problems with relying on code inspection instead of plan inspection. Humans are not always top-notch when it comes to interpreting code execution; that is why we have bugs. Second, looking at the code alone tells you nothing about the current infrastructure state. The plan gives Terraform the chance to say to us:
Given the current state (the world as I see it), and given the configuration changes you’ve made (how you have said you want the world to be), this is the plan (what I’m going to do).
The great thing about the plan is that it is Terraform telling us what it will do, not our guess at what it should do. Plan inspection is the mechanism for safety Terraform supplies. To use the apply command safely in automation, we must provide a way to use this mechanism and supply approval.
Building a safe Terraform pipeline
Now that we understand the importance of reviewing the Terraform plan and providing explicit approval let us create pipelines that leverage these Terraform features. Imagine we have an uncomplicated Terraform configuration (like this) that we want to deploy with automation. I’ve taken this example from the Terraform getting started guide, and it deploys these resources:
- An Azure resource group
- A virtual network
- A subnet
- A public IP
- A network security group that allows SSH
- A network interface
- A virtual machine
Setup Remote State
To get this project ready for automation, we need to set it up to use a remote backend for state storage. Terraform’s “Remote State” feature provides a mechanism to allow multiple developers to collaborate on the same Terraform code base. Terraform automation requires a remote state store because the build agents are ephemeral, and the entire agent pool must share state changes. When using an Azure Storage Account for remote state storage, our workflow automatically benefits from encryption at rest, role-based access control, and locking mechanisms.
This script brings up a storage account with acceptable settings for a Terraform backend:
This script creates a resource group and a storage account with a basic configuration for durability and history. It enables transparent replication to a second Azure region and opts-in to soft-deletes. Soft deletes allow you to recover older versions of the state file. Older state file versions can help you reset your configuration when other recovery options fail.
This script does not address any security features like the storage account firewall, Advanced Threat Protection, or logging and monitoring. Requirements for security vary by team and industry. Still, this storage account configuration does take advantage of default security features like Role-based Access Control, transparent encryption, and HTTPs-only access.
With this least-common-denominator configuration, we are still much better off than we are when we keep our state file on our local machine. With Remote State in an Azure Storage Account, our state file is backed up, versioned, encrypted and password protected. That’s pretty cool, but we have to configure Terraform to use the storage account we just created.
In older versions of Terraform (before Terraform 12), configuring the backend storage provider to use Azure Storage Accounts required providing the storage account access key. Terraform added new authentication methods for Azure in Terraform 12. We can now access our Remote State using our user principal when logged into the Azure CLI on our local machine. It makes configuring the Terraform backend super simple:
To configure the backend storage, I’ve added a backend block to the terraform block. In this block, I need to tell Terraform where to find the state file by specifying the resource group, storage account, blob container, and finally, the file name (called key in the configuration). The file name can be anything since we haven’t yet put any state in Azure–this is where Terraform saves the state once we do.
I do not need to provide any credentials inside the source code. Even if you are still on Terraform 11 and using the storage account access key, Terraform does not require hard-coded credentials. Passing credentials to Terraform is a common problem, and Terraform provides a feature called “Partial Configuration” to solve this problem flexibly. Partial Configuration gives Terraform the ability to pull configuration from several sources, including config files, environment variables, and command-line switches. You can pass your secrets to Terraform in any way that meets your security requirements. In the case of Azure CLI authentication, we don’t need to pass credentials to Terraform at all. Terraform can use the session established by the CLI if we are already logged in.
Once logged into the Azure CLI, run Terraform’s init command to update your configuration to use the storage account you specified. You should see a prompt asking if you want to move the existing state to the storage account. After replying yes, Terraform prints a message indicating that the update to use remote state succeeded.

By visiting the terraform blob container in the account, you can verify the state file successfully saved using the key you specified.

Now that our remote state is set up, we are ready to create an azure-pipelines.yaml file to define the Build stage.
Create Infrastructure Build Stage
When it comes to creating a safe Terraform pipeline, the most critical design consideration is choosing to call Terraform’s plan command with the right arguments. In the simplified getting-started workflow, we did not even call plan–not explicitly at least. The workflow still works because the apply command implicitly calls plan when no plan is available. When calling plan, Terraform prints output identical to the apply output, up until the prompt to review and approve. The prompt to approve does not appear when you call plan, plan just exits.
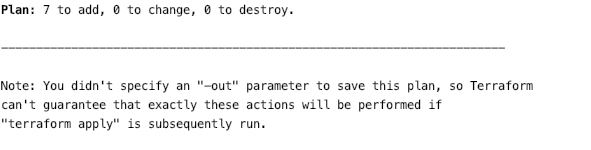
This default behavior is okay as a debugging tool. Terraform’s plan command allows us to double-check our intention against what Terraform thinks our code is trying to say. Terraform always wins any disagreement. If we don’t like the plan, we need to change our code. Outside debugging, the default behavior of the plan command does not help us make our workflow any safer. Even if we like what we see in the plan command output, Terraform only keeps this plan in memory. Terraform generates a new plan during apply and asks for approval. We can change this behavior by using the -out parameter when calling plan. The default invocation of plan nags you if you fail to use this parameter:
When using the -out parameter, you get all the same debugging goodness of plan, but Terraform also saves the plan to a file. Once you have a saved plan, you can pass the plan to apply. When apply receives a specific plan during invocation, Terraform skips the rework of recalculating the plan. More importantly, by invoking apply with a specific plan, Terraform assumes you have reviewed and approved that plan, and skips the interactive prompt for approval. Reading the docs, the whole purpose of this behavior is that:
Explicit execution plans files can be used to split plan and apply into separate steps within automation systems.
Automated build pipelines are precisely the type of “automation systems” the documentation is referring to. From now on, if you are reviewing a proposed Terraform automation pipeline that doesn’t split plan and apply, that is a design smell worth investigating. Now that we understand the purpose of creating an saved plan file, we begin to understand that the build artifact for our pipeline should be the saved plan. In between build and deployment, there should be a review and approval step. Finally, the deployment should consume the explicit, saved, approved plan.
With these theoretical underpinnings, let us write our pipeline YAML. Here are the build stage steps:
Remember that our goal is to create safe Terraform automation, and the design of these build stage steps supports that goal. This stage has these steps:
- Download a specific version of
terraform - Add credentials to the environment
- Run
terraform init - Run
terraform plan - Package the Terraform configuration
- Publish the build artifact
I’ve implemented these steps as external scripts to make them easier to show in the sections to follow. They should also work just fine as inline scripts if you prefer.
Note: To adopt this YAML as written requires a service connection called “Azure MSDN.”
Download a specific version of terraform
Although Azure DevOps hosted build agents include Terraform by default, this step ensures consistent results even if Microsoft updates the pre-installed version. You may also do this to take advantage of newer Terraform versions without waiting for Microsoft to update. The consistency is the key–you should be in control of the inputs to your pipeline, whether that is code or tool versions.
This script references two variables defined at the top of the pipeline YAML. The first variable indicates the version of Terraform you want to use. The second is the verification SHA provided by Hashicorp. It is a good idea to verify integrity when downloading software from the internet to ensure it has not been tampered with or garbled in transmission. If a vendor doesn’t provide the SHA themselves, then shame on them. You can still calculate the value and put it into pipeline variables or a shared variable library.
Once the script confirms the integrity of the terraform binary, it moves the program to the proper bin directory, prints the version, and removes the downloaded zip file.
Add credentials to the environment
Both init and plan use the same credentials, so this step configures them once and avoids a redundant Azure CLI login/logout.
This script executes inside an Azure CLI task. Azure CLI tasks are perfect when you need to execute Azure CLI commands. They automatically log in to Azure using the Service Principal associated with the Azure subscription or Service Connection for your project (I’m using a Service Connection in this example). After login, the task sets your default subscription, which is essential when you have more than one subscription associated with an Azure tenant. Next, the task executes your script and finally clears your account credentials when the task ends.
There is one more option significant to note: addSpnToEnvironment. This option makes the Service Principal credentials available to the script running inside the task. The script shown above captures these variables and sets them as secret pipeline variables. Secret pipeline variables are an excellent feature. When Azure DevOps sets a variable with the issecret=true flag, it creates an environment variable with the value encrypted. Azure DevOps only decrypts the value for tasks that explicitly request access to the variable. I’ve done this mapping using an env block in the “Terraform Init” and
“Terraform Plan” tasks that follow.
Run terraform init
Because the Azure DevOps build agent starts with a clean slate, we need to execute Terraform’s init command to get the project ready for the plan command. This step uses the credentials configured in the previous step to read the remote state from our Azure Storage Account.
The pipeline scripts call init and other Terraform commands with arguments to make Terraform more friendly in automation. These arguments are passed both as environment variables and as CLI switches. The build YAML declares a global variable TF_IN_AUTOMATION recommended by the docs to make “some minor adjustments” to Terraform’s output. Even with this variable declared, suppress interactive prompts with -input=false. If we allowed Terraform to ask questions during the build, there would be no way to dismiss the prompts. Without this option, the build would wait for a response that never comes and eventually timeout.
Note: if you are still using the older log viewing experience in Azure DevOps, take advantage of the
-no-colorflag. That version of the viewer did not understand the color codes emitted by Terraform to colorize the output.
Run terraform plan
Now we read the code, compare it to the deployed infrastructure, and save Terraform’s planning output. This step is where the magic happens.
This script follows the same pattern as the init script. Terraform receives credentials from the injected environment secrets, suppresses interactive input, and calls plan with an -out parameter to save the plan to a local file. Terraform has now calculated a specific plan–this is the crucial build artifact. The remainder of the pipeline packages this artifact into a format usable by the deployment stage.
Package the Terraform config folder
Because Azure DevOps disposes of the build agent when the build completes, the agent that eventually runs apply is guaranteed to be different than the agent running plan. We can refer back to the HashiCorp guide “Running Terraform in Automation” for details on working with these constraints. In short, the explicit plan file by itself is not executable by Terraform. We must preserve the working directory as a whole so that the work done by the init command is available for the apply command. To ensure the artifact preserves executable file bits and other permissions, we use a tar archive.
Publish the build artifact
Hopefully self-explanatory. The pipeline needs to publish the tarball it just created. This step makes it available to the Release pipeline after a human has reviewed and approved the plan.
Setup Deployment Environment
Our build stage has produced a plan file. We have the artifact that we need to make the apply command non-interactive. To also make the apply safe, we must stop apply from running until after we have had a chance to review and approve the plan. We use an Azure DevOps Environment for this purpose. While an Environment provides a few different features, Approvals are most important to this discussion. When a deployment stage targets an Environment, Azure DevOps evaluates all configured approval checks before allowing the deployment to proceed. To support a Terraform DevOps workflow with plan approval, configure an Environment with a manual approval check.
If we target an Environment that doesn’t exist, then Azure DevOps creates it automatically. However, we want to create it manually first to ensure that Azure DevOps applies the manual approval check to every deployment. The azure-pipelines.yaml definition does not include the Environment configuration. To create an environment, login to Azure DevOps and choose Environments under pipelines, then choose Create Environment:

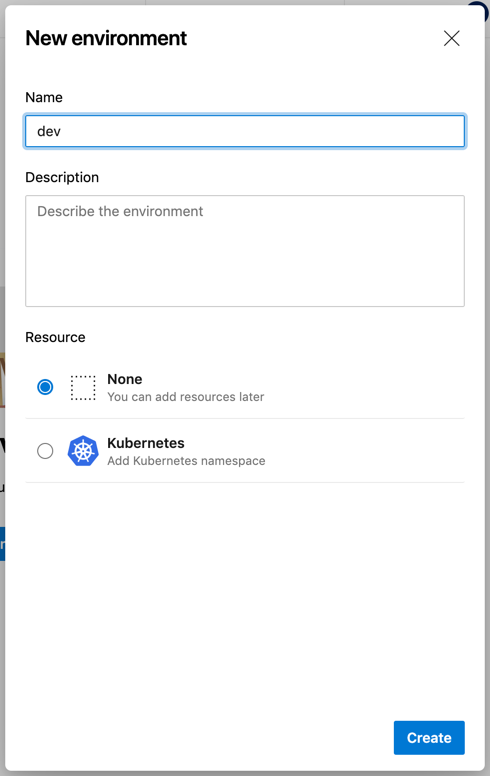
Next, type an environment name and click the Create button. You do not need to add a resource, choose None. I named my environment dev:
While we can now use the Environment, we first want to configure a manual approval check before continuing to configuring the deployment stage.

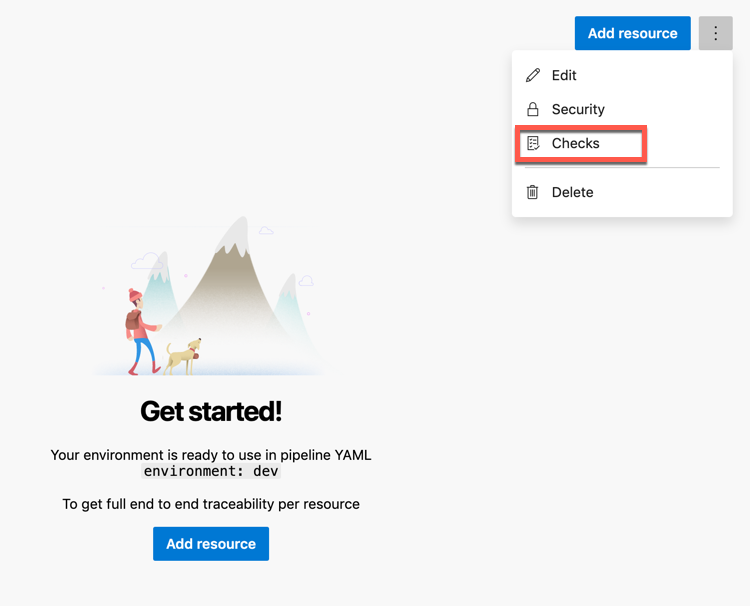
To configure Checks for the Environment, use the vertical ellipsis menu to access the Checks menu item.
Click Create to create a manual approval.

Add an appropriate approver and instructions. I added myself as an approver. Then click Create.

Azure DevOps displays the Check for you on success.

The environment is now ready to use with a Terraform pipeline. The next section shows how to set up the deployment stage and configure the deployment to target this environment. Because the deployment targets this environment, it automatically waits for approval before executing.
Remember, we are building to a workflow to build a plan file, review and supply approval, and finally apply the plan to the infrastructure. Using environments with checks gives us the opportunity to fulfill our part of the workflow: review and approve.
Create Infrastructure Deployment Stage
Now that we have an environment with an approval check configured, we have reached the home stretch. Shown below is the azure-pipelines.yaml file in its entirety, updated to include the deployment stage:
Our deployment stage has these steps:
- Download the build artifact
- Extract artifact files
- Download a specific version of
terraform - Add credentials to the environment
- Run
terraform apply
The environment: dev property in the DeployDev job definition causes this job to target the dev environment we created in the previous step. Because the job targets the environment, all checks configured for that environment must pass before any steps in this job can run.
As before, I’ve implemented these steps as external scripts to make them easier to show in the sections to follow, but they should work just fine as inline scripts if you prefer.
Download the build artifact
Our plan file is part of the build artifact created during the build stage. We must always assume that different stages run on different Azure DevOps build agents. So the first thing to do is download that artifact to the current agent.
Extract artifact files
The build artifact itself is a gzipped tar archive, and we must extract it before we can access the plan file and use it. The Terraform documentation mentions using the exact matching absolute path as the location on the build agent when unpacking this archive. However, in practice, I’ve found that matching the relative path to System.DefaultWorkingDirectory works fine when dealing with the azurerm provider.
Download a specific version of terraform
Since this job runs on a new build agent, we must repeat this step to ensure the correct version of Terraform. So this step reuses the previous terraform-download.sh script to pin the expected version of the terraform binary.
Add credentials to the environment
Terraform’s apply command uses the same type of credentials as init and plan in the build stage. Once again, we reuse the script to perform the same task on the deployment agent.
Run terraform apply
Now we have prepared the deployment agent and are ready to deploy the explicit plan.
This script follows the same pattern as the other terraform scripts. Terraform receives credentials from the injected environment secrets, suppresses interactive input, and calls apply with the name of the plan file as an argument. Terraform reads the stored plan, assumes it has been reviewed and approved and updates the infrastructure immediately.
Review the Plan
The pipeline we’ve designed can build a Terraform plan file, prompt for approval to deploy the plan, and finally, deploy it once we provide approval. To approve the deployment, we must review the plan, and nothing in the pipeline itself explains how to do that. It turns out to be a simple task in Azure DevOps.
Although our build stage stored the plan file in the build artifact, we do not need to download the artifact, unpack it, and read it. The plan file is not designed to be human-readable. Terraform does provide a command (show) to convert the plan into a human-readable format, but this step is still extra work. In Azure DevOps, we have a more accessible option: the build log.
Terraform’s default behavior is to print the plan in a human-readable format to stdout, and Azure DevOps captures the plan in the log. You can visit the build log page and review the plan there. If the configuration changes are not fresh in your mind (or a teammate made the changes), it’s a good idea to review the commits or PR that generated the build. When evaluating the plan, you should consider what Terraform says will happen as well as what the author intended. Having the code fresh in your mind while reviewing the plan lets you do both.
The Big Picture
Once you understand what Terraform expects from you when running in the local interactive mode, you can design an Azure DevOps pipeline to meet these expectations. In the simple interactive workflow, you are the safety check, and Terraform enforces this as best it can by prompting you when it executes apply. The desire to automate the execution of Terraform configuration does not remove the need to keep the safety check in place. While most examples online disable the check with -auto-approve, this post shows how to keep the check and build a safer pipeline.
Instead of taking the -auto-approve short cut, real-world pipelines should generate plan files using the plan command with the -out parameter. Deployment stages should consume the same plan during apply–but only after you’ve reviewed Terraform’s proposed changes and decided they are, in fact, changes that you want. To achieve this, run Terraform in both pipeline stages: build and deployment.
The build stage creates an artifact containing the plan file:
- Build
- Fetch the code
- Generate the explicit plan
- Package the Terraform configuration with the plan as an artifact
We review the plan, then approve and run the deployment stage:
- Deployment
- Fetch build artifact
- Apply the plan
Changing infrastructure has real consequences. Infrastructure as Code gives us the tools needed to make this process safer and accelerate your ability to deliver platforms to run applications and, ultimately, the business. Terraform mitigates many sources of human error found in traditional infrastructure management techniques, but operating a powerful system at full speeds has its risks too. Continuous Delivery pipelines are lovely, but it is also ok to slow down and review before making changes. Ask yourself what is the more significant risk: downtime from bad deploys or delay from reviewing the plan?
Slow down, create a gate, and read your plan before clicking “Approve.”