Publish a Jekyll Site to AWS S3 with CircleCI
This is part three of a three part guide where I document the process of getting this blog setup. Here are some links to the other parts:
In this post I’ll walk through the process I used to setup continuous publishing for this blog using GitHub, CircleCI, and S3. I write posts on this site using jekyll, and I already set up a jekyll project in a previous post.
To create a publishing pipeline for the site I’ll start by pushing the existing site to a remote repository on GitHub. Next, I will publish the site to AWS S3 manually and configure the website to use a custom domain. Once I have a working version of the site hosted on S3, I’ll setup CircleCI to connect the two sides of the pipeline so that changes pushed to GitHub will automatically flow through to the S3 website.
Here are some notes on the services I’ll be using:
-
GitHub to store the site repository - Jump
- An account is required, if you are following along sign up now.
- A free account with public repositories will be fine.
-
Amazon Web Services to host the site - Jump
Note: that an AWS account has a free tier, but it is not free after the first year.
-
An account is required. The AWS sign up process can be a little intimidating.
-
You will need to provide a credit card during sign up; certain services are not free even in the first year.
-
AWS uses a pretty garbled and annoying CAPTCHA. You may have to try several times before you can decipher the image.
-
You will need to provide a telephone number during sign up. AWS uses an automated system to call for identity verification.
Note: AWS uses a second annoying CAPTCHA at this stage–just in case you were replaced by a robot after the first CAPTCHA.
Note: You may need to retry this step a few times before AWS can place the outbound call. A few people I know have mentioned this was a problem for them.
-
-
CircleCI to generate and validate the jekyll site - Jump
- An account is required, if you are following along sign up for CircleCI after creating your GitHub account.
-
CircleCI has a free tier for private repositories, it has an even better free tier for public repositories. Either one should work fine for building our jekyll site.
Note: CircleCI supports BitBucket as well if you prefer that service to GitHub.
Publish the Jekyll Site to GitHub
I suspect a good number of readers are already familiar with GitHub. If this is you, then create a public repository on GitHub and push your site to it. You can skip to the next section.
However, for those who have been following along and prefer step-by-step instructions, read on.
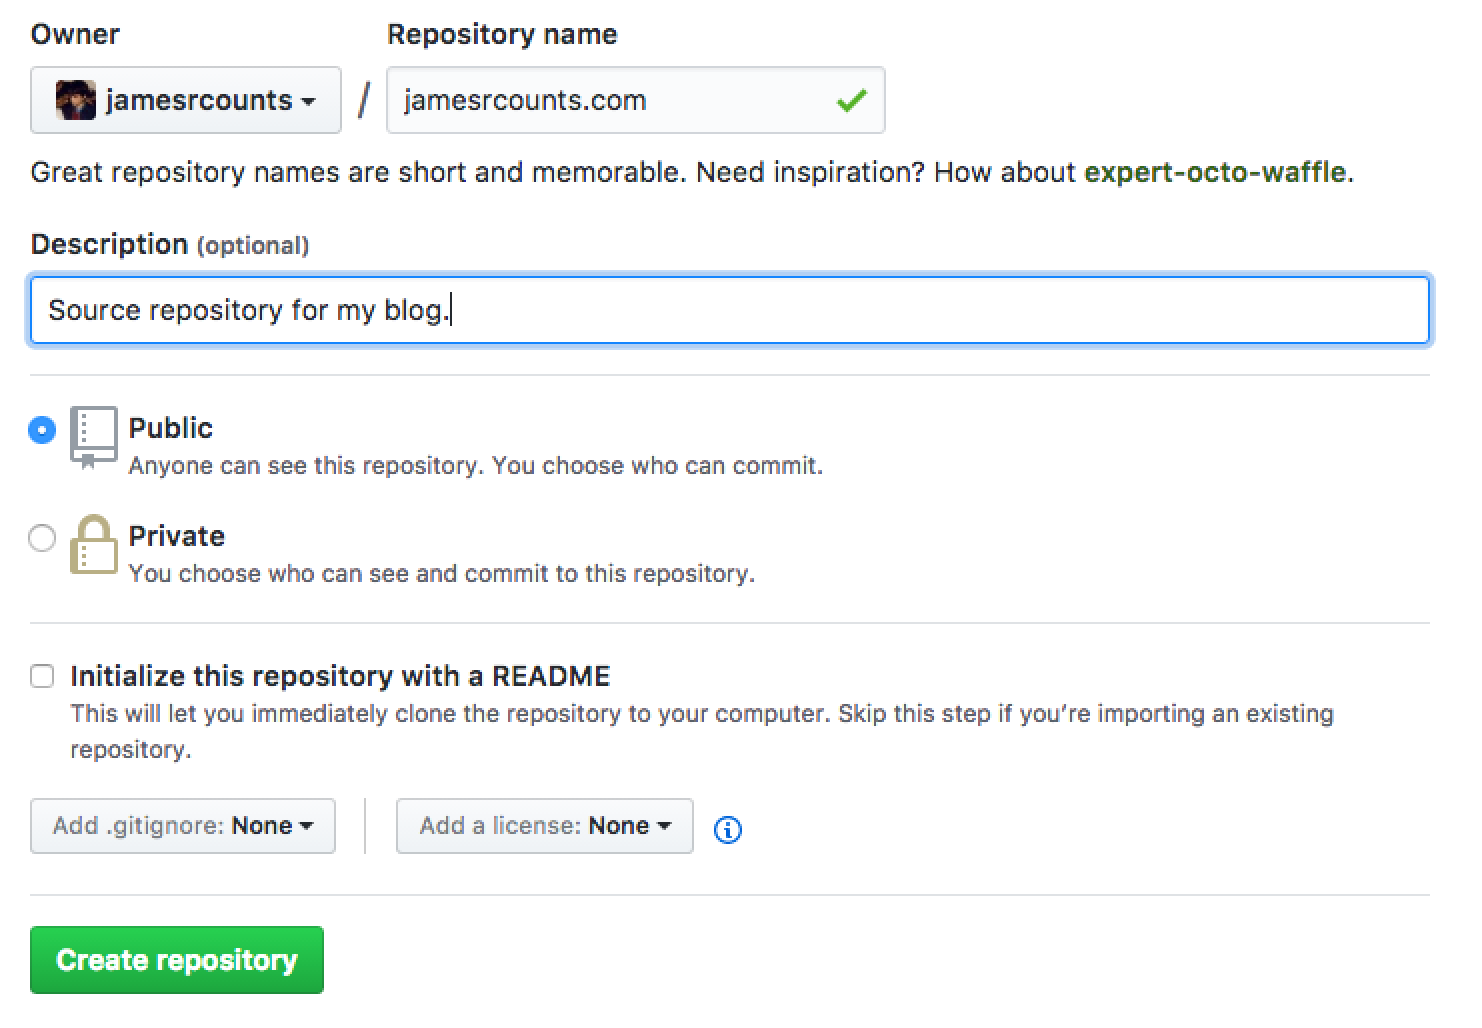
Create Remote Repository
Take these steps in your browser.
-
Create your account and log in.
-
Click the green “New Repository” button on the right side of the homepage.
-
I will use “jamesrcounts.com” as the name, to match the jekyll project name
-
Create a public repository
-
Do not initialize the repository with a readme, or add .gitignore/.gitattributes
-
Click “Create Repository”
-
Push to Remote Repository
Run these commands in your local bash terminal.
-
First, add the remote
git remote add origin ${REPOSITORY_URL}Example:
git remote add origin https://github.com/jamesrcounts/jamesrcounts.com.git -
Then push the contents
git push -u origin master
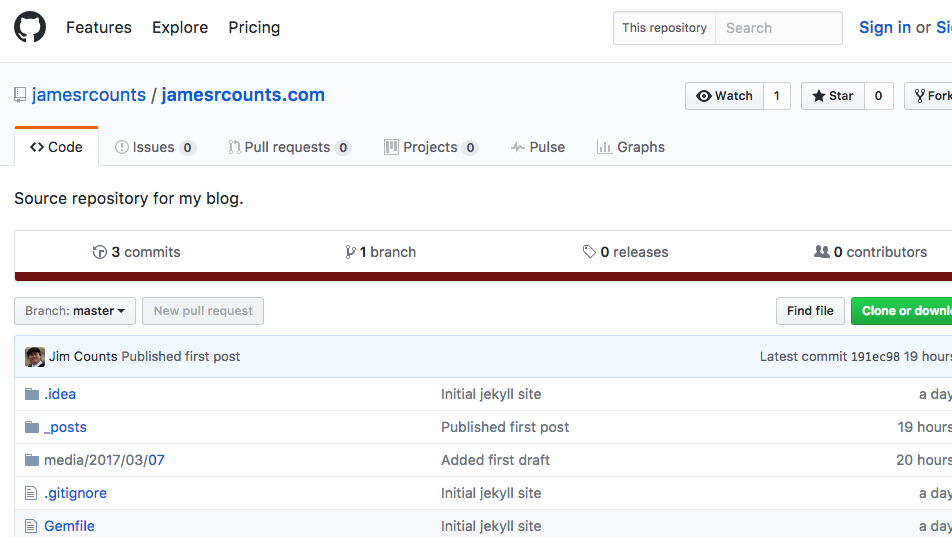
Check the Remote Repository
Refresh your browser and you should see your contents on GitHub.
Create an AWS S3 Website
To host my site in AWS I will need a storage bucket to put our files into. Turning a bucket into a website requires some special configuration of the bucket. I also want to setup a custom domain for the website, and for that, I’ll use Amazon’s Route53 service.
Finally, before leaving the Amazon section of this post, I’ll set up credentials and permissions for CircleCI to use when publishing updates to the site.
Create Bucket(s)
You can find further details in Amazon’s own documentation - Create Buckets
I will create two buckets jamesrcounts.com and www.jamesrcounts.com so that I can support requests with and without the www.
Because I’ll use AWS Route53 to handle DNS for the website, the name of the bucket matters. The bucket name must match the domain you intend to use, if you haven’t purchased your domain yet, you should do so now. This is optional. If you don’t want to spend any money, or you just don’t care about a custom domain, then you can just use default URL AWS provides you.
-
After creating your AWS account, sign in and visit s3
-
Create two buckets - Instructions
- I’ll use the names
jamesrcounts.comandwww.jamesrcounts.com - I’ll pick “US West (Oregon)” as the region, but you should choose a region near you.
-
Click “Create”.

- I’ll use the names
Upload Site and Configure Primary Bucket
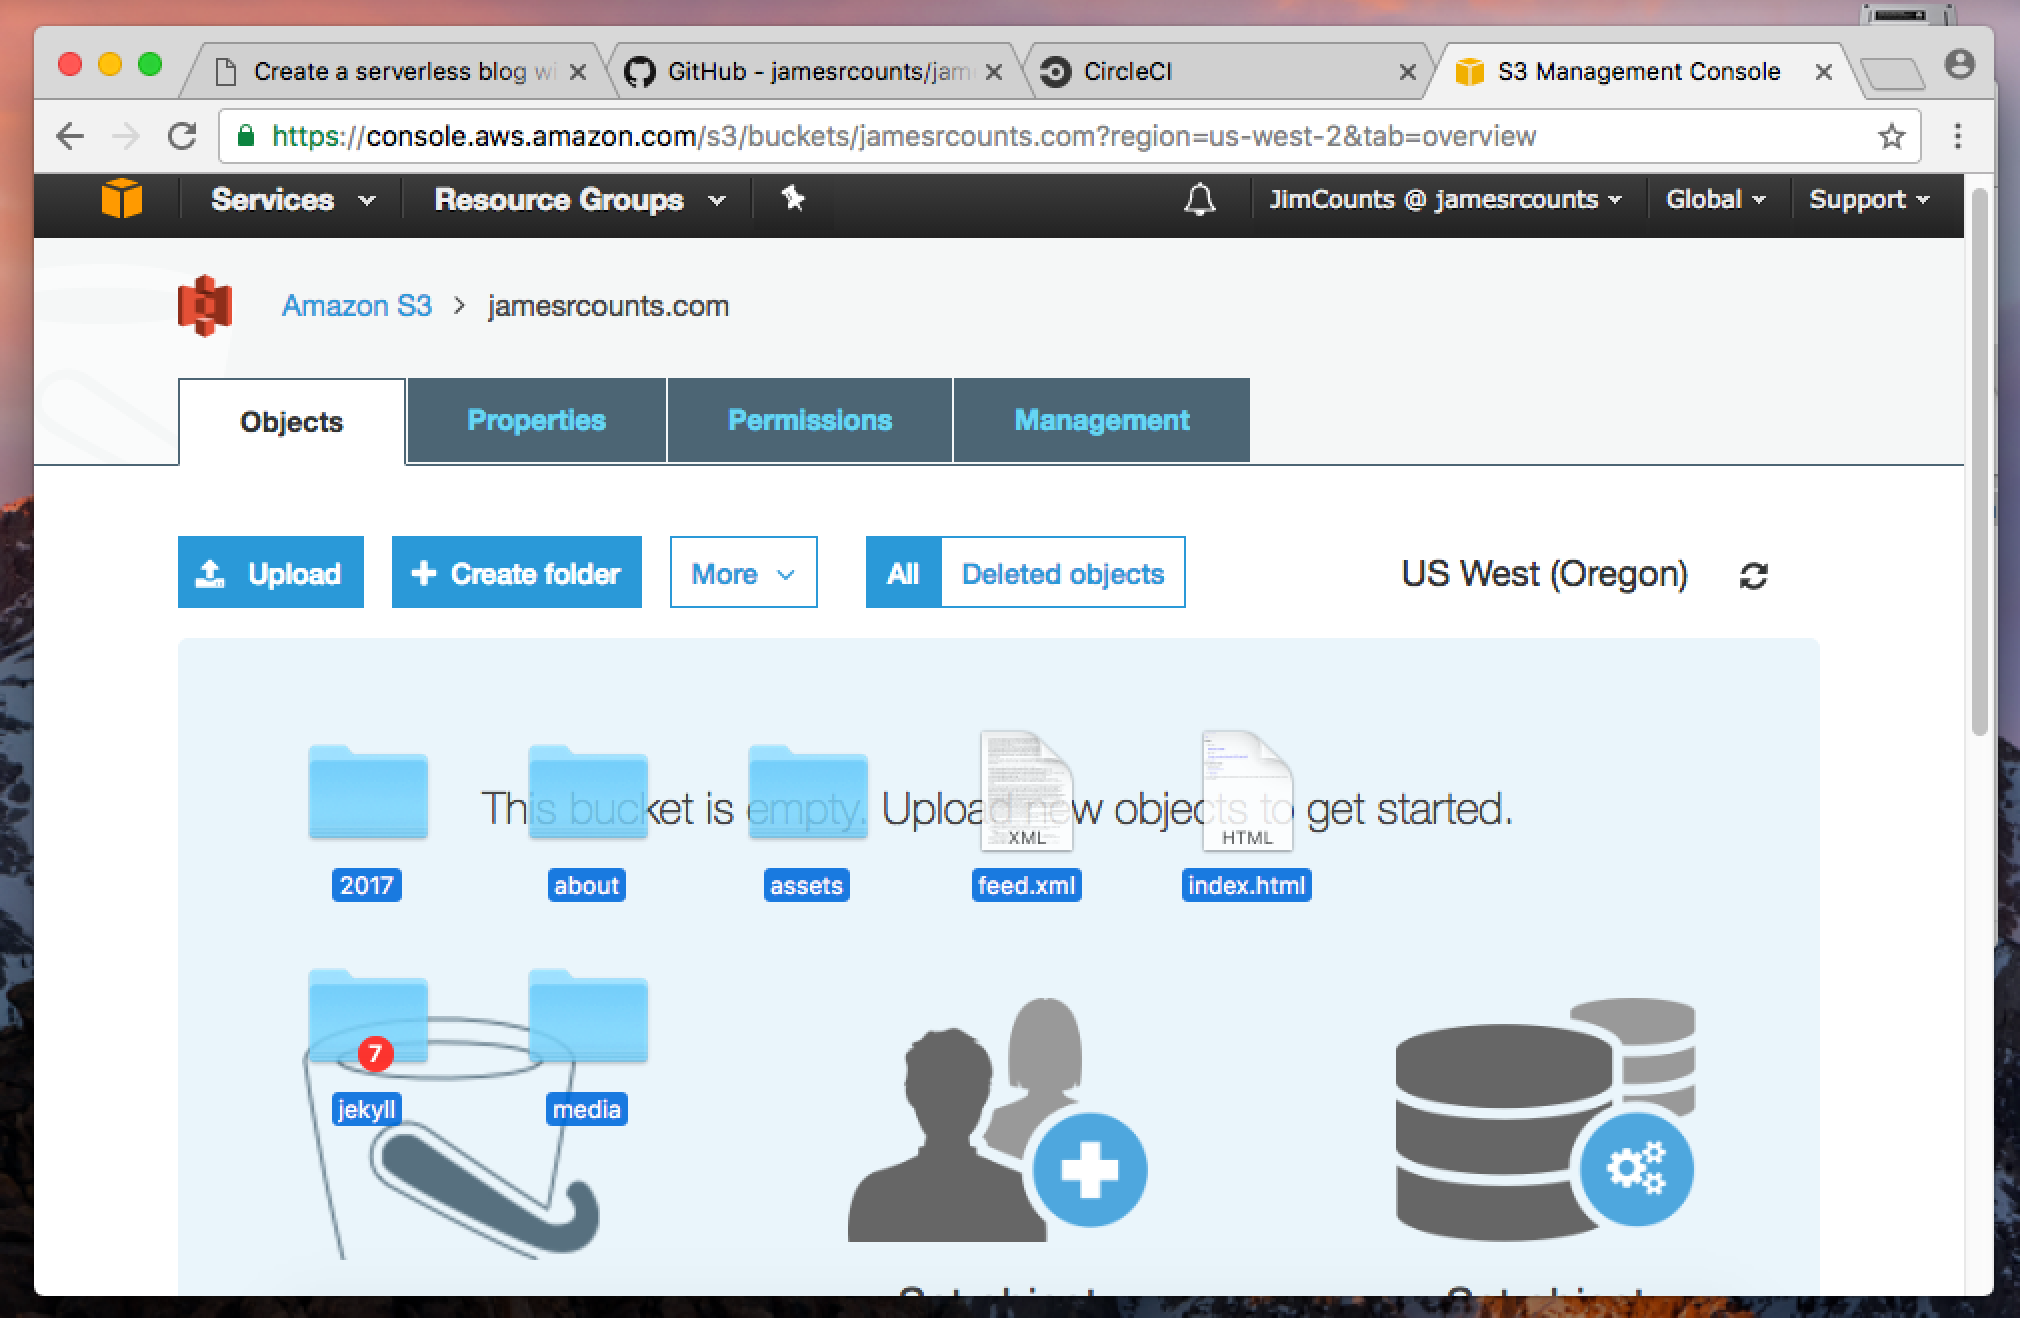
The primary bucket can be either bucket that you created in the previous step. I will be the bucket with the “naked” domain (no www prefix). The goal is that CircleCI should push content into this bucket, as mentioned before. However, there is a fair bit of configuration that goes into setting up the S3 website, so I want to put some content in the bucket now so that I can be sure that the configuration is correct before setting up CircleCI.
-
Build the site
Run this command from your project root in your local terminal.
bundle exec jekyll build -
Copy everything inside the
_sitefolder to the primary bucket.-
You can just drag them in from your file manager and drop them in the blue area of your bucket.
-
Then click the “Upload” button to send the files.
-
-
Configure the bucket for website hosting - Instructions
- Click “Properties”
- Click “Static website hosting”
- Choose “Use this bucket to host a website”
- Enter “index.html” as the Index Document.
- Click the “Save” button
-
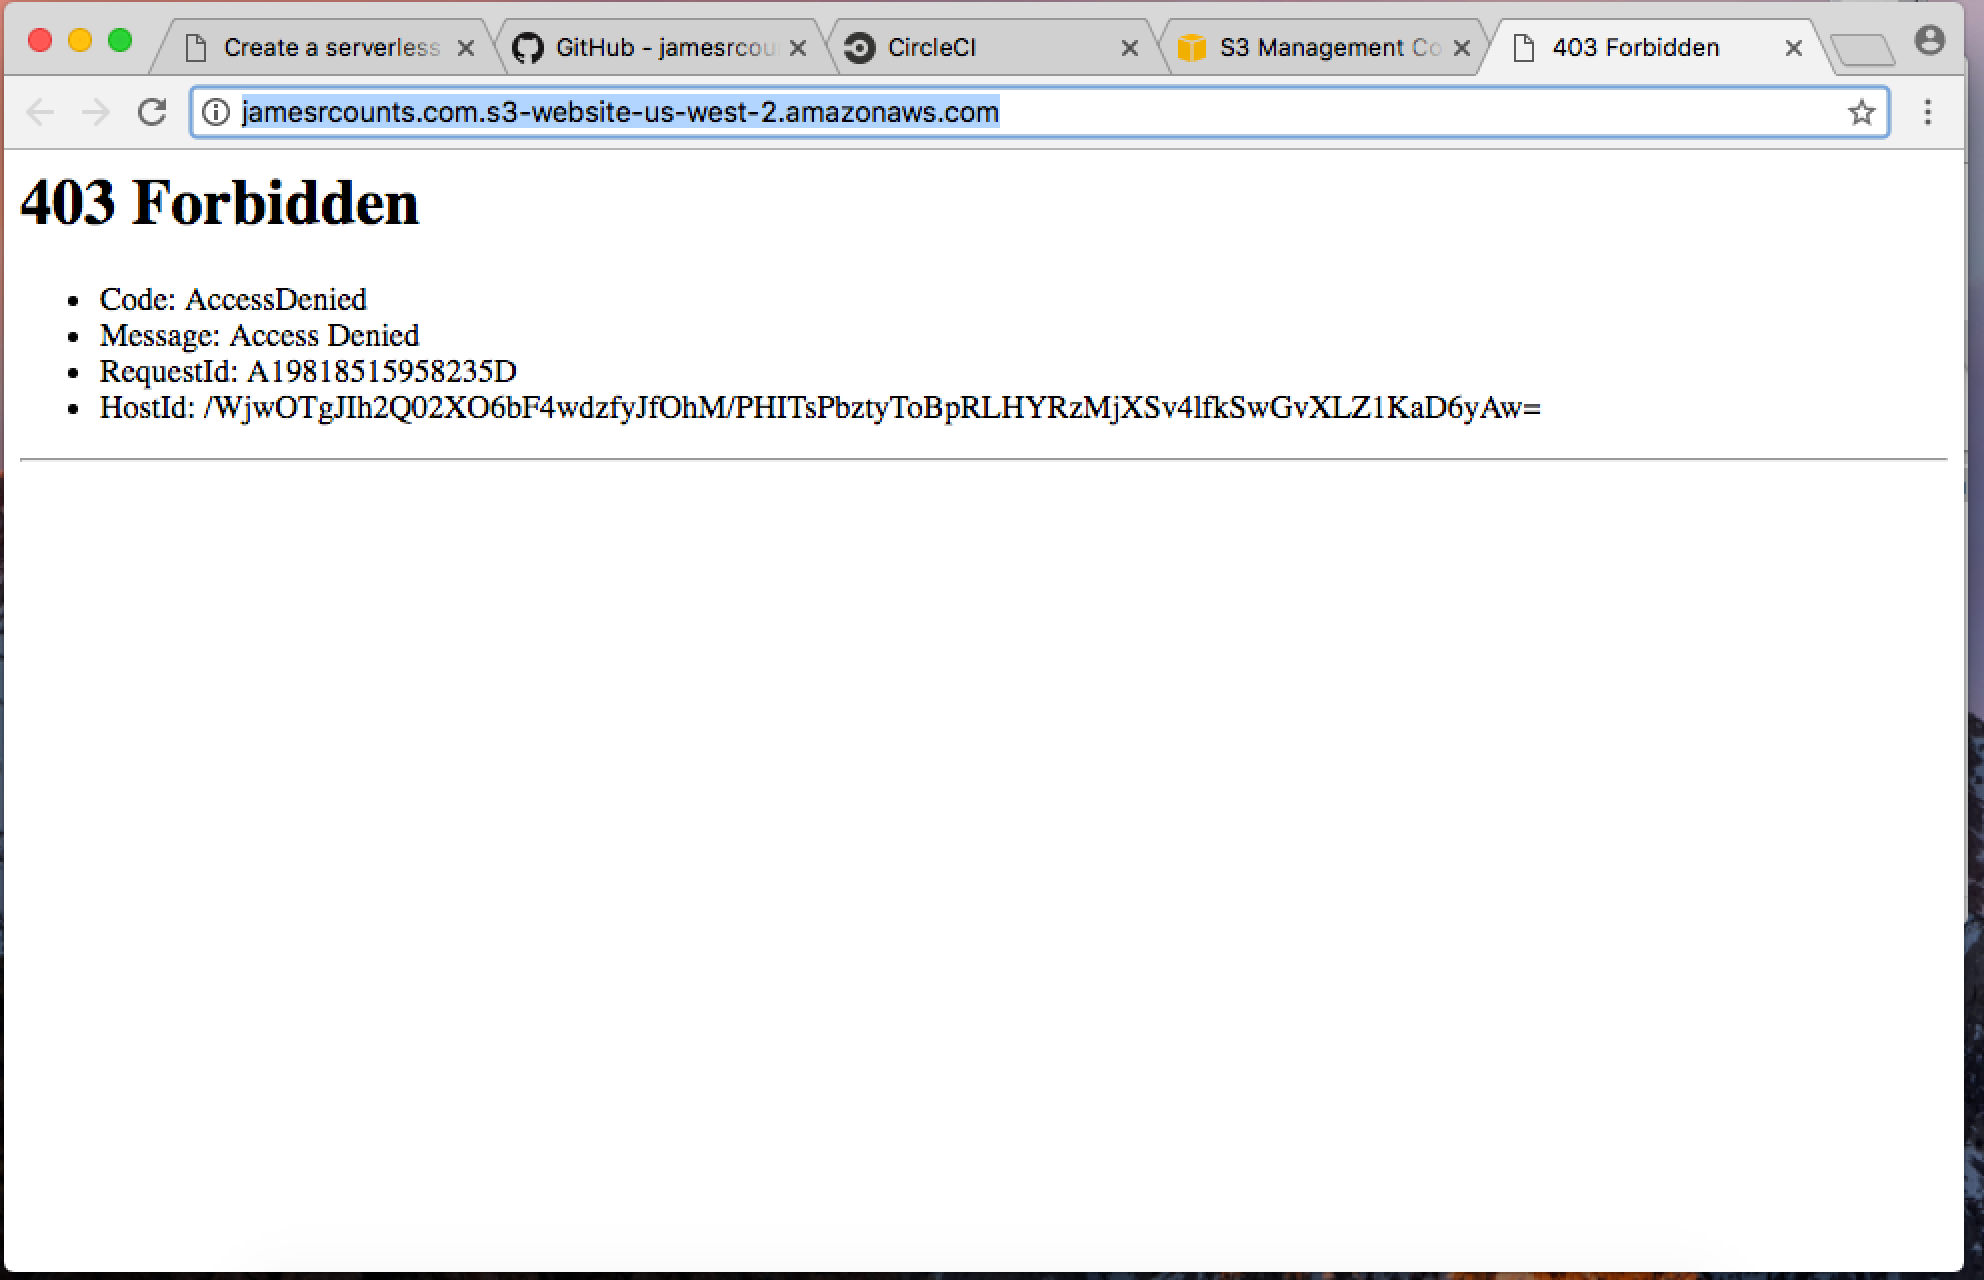
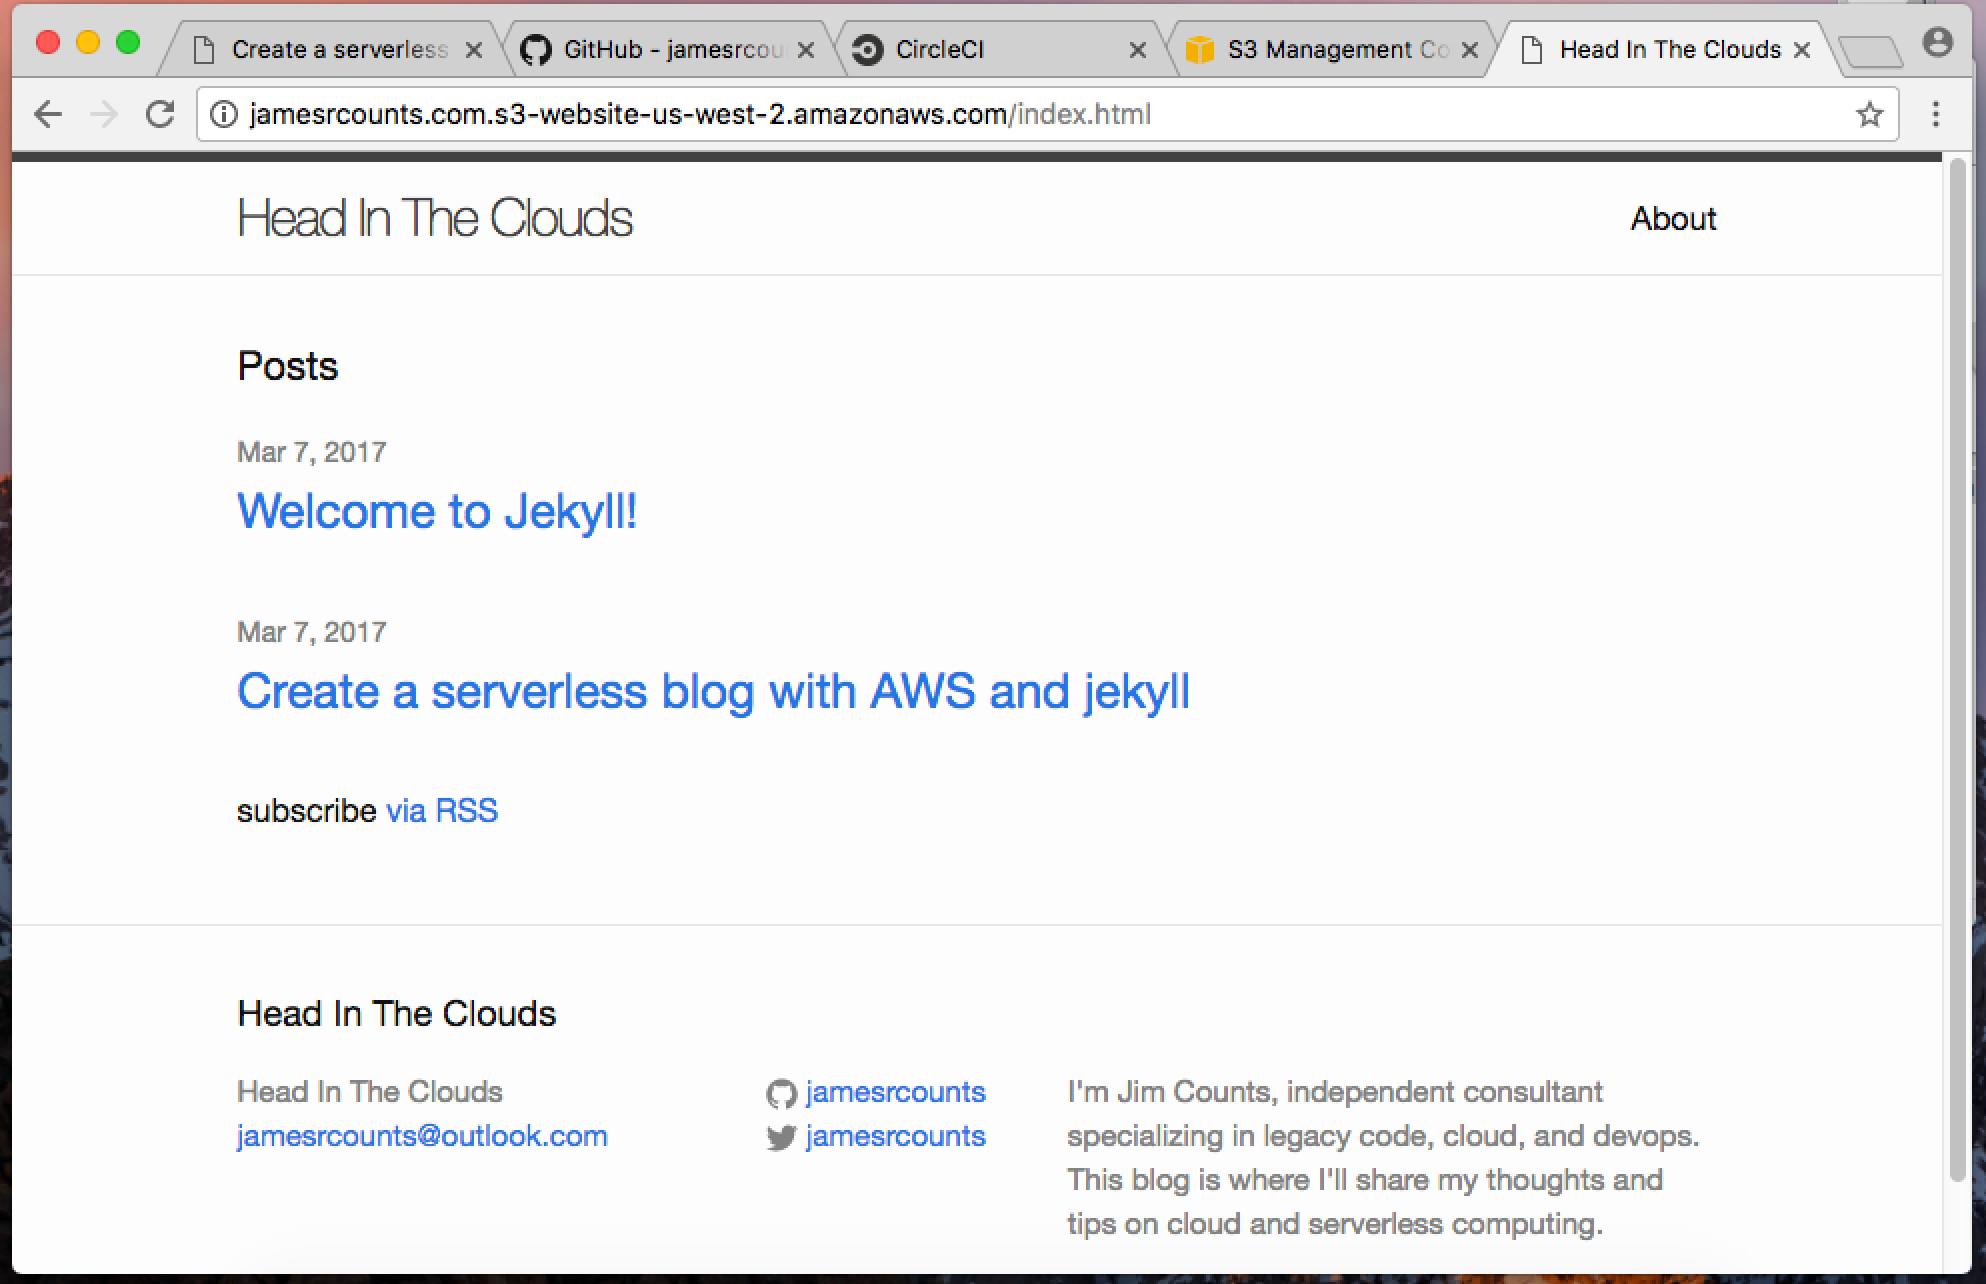
Although the website URL is now available, we receive a 403 error when trying to access the site.
-
Set public bucket permissions - Instructions
- Click “Permissions”
- Click “Bucket Policy”
-
Paste in a policy to grant read-only permission
{ "Version": "2012-10-17", "Statement": [ { "Sid": "AddPerm", "Effect": "Allow", "Principal": "*", "Action": [ "s3:GetObject" ], "Resource": [ "arn:aws:s3:::jamesrcounts.com/*" ] } ] }Note: You need to update the bucket name in your version of the policy
Note: Many ARNs contain your account number, so you should usually be careful about revealing them publicly. However, S3 ARNs are part of a global namespace that does not include the account number, so I’m not worried about showing it here – you could have figured it out anyway from the bucket name.
- Click “Save”
-
We can now view the site on the public internet!
Configure Secondary Bucket
If you are not going to use a custom domain, then you can probably skip this step. I don’t see much usability benefit to having one default URL redirect to another default. It’s up to you, but I’ll only cover the custom domain case here. If you want to skip this step, go ahead and delete the secondary bucket now, it is only used for redirects.
-
Configure the
wwwbucket to redirect to the primary bucket - InstructionsTake these steps in your browser after navigating to S3.
- Open the “www” bucket.
- Click Properties.
- Click “Static website hosting”
- Choose “Redirect requests”
- Configure the redirect
- I’ll enter “jamesrcounts.com” for the target bucket
- I’ll enter “http” as the protocol
-
Click “Save”

-
Click on “Static website hosting” again, then click on the endpoint URL.
Note: It may take a few moments to redirect.
-
When the browser redirects it may not resolve to a site.
This depends on how your on how your domain is currently configured. You may see a default website provided by your registrar, or nothing at all. Because the primary bucket has a
.comin it, S3 treats it like an address. To see the redirect to my site, I need to configure thejamesrcounts.comdomain to resolve to my primary bucket.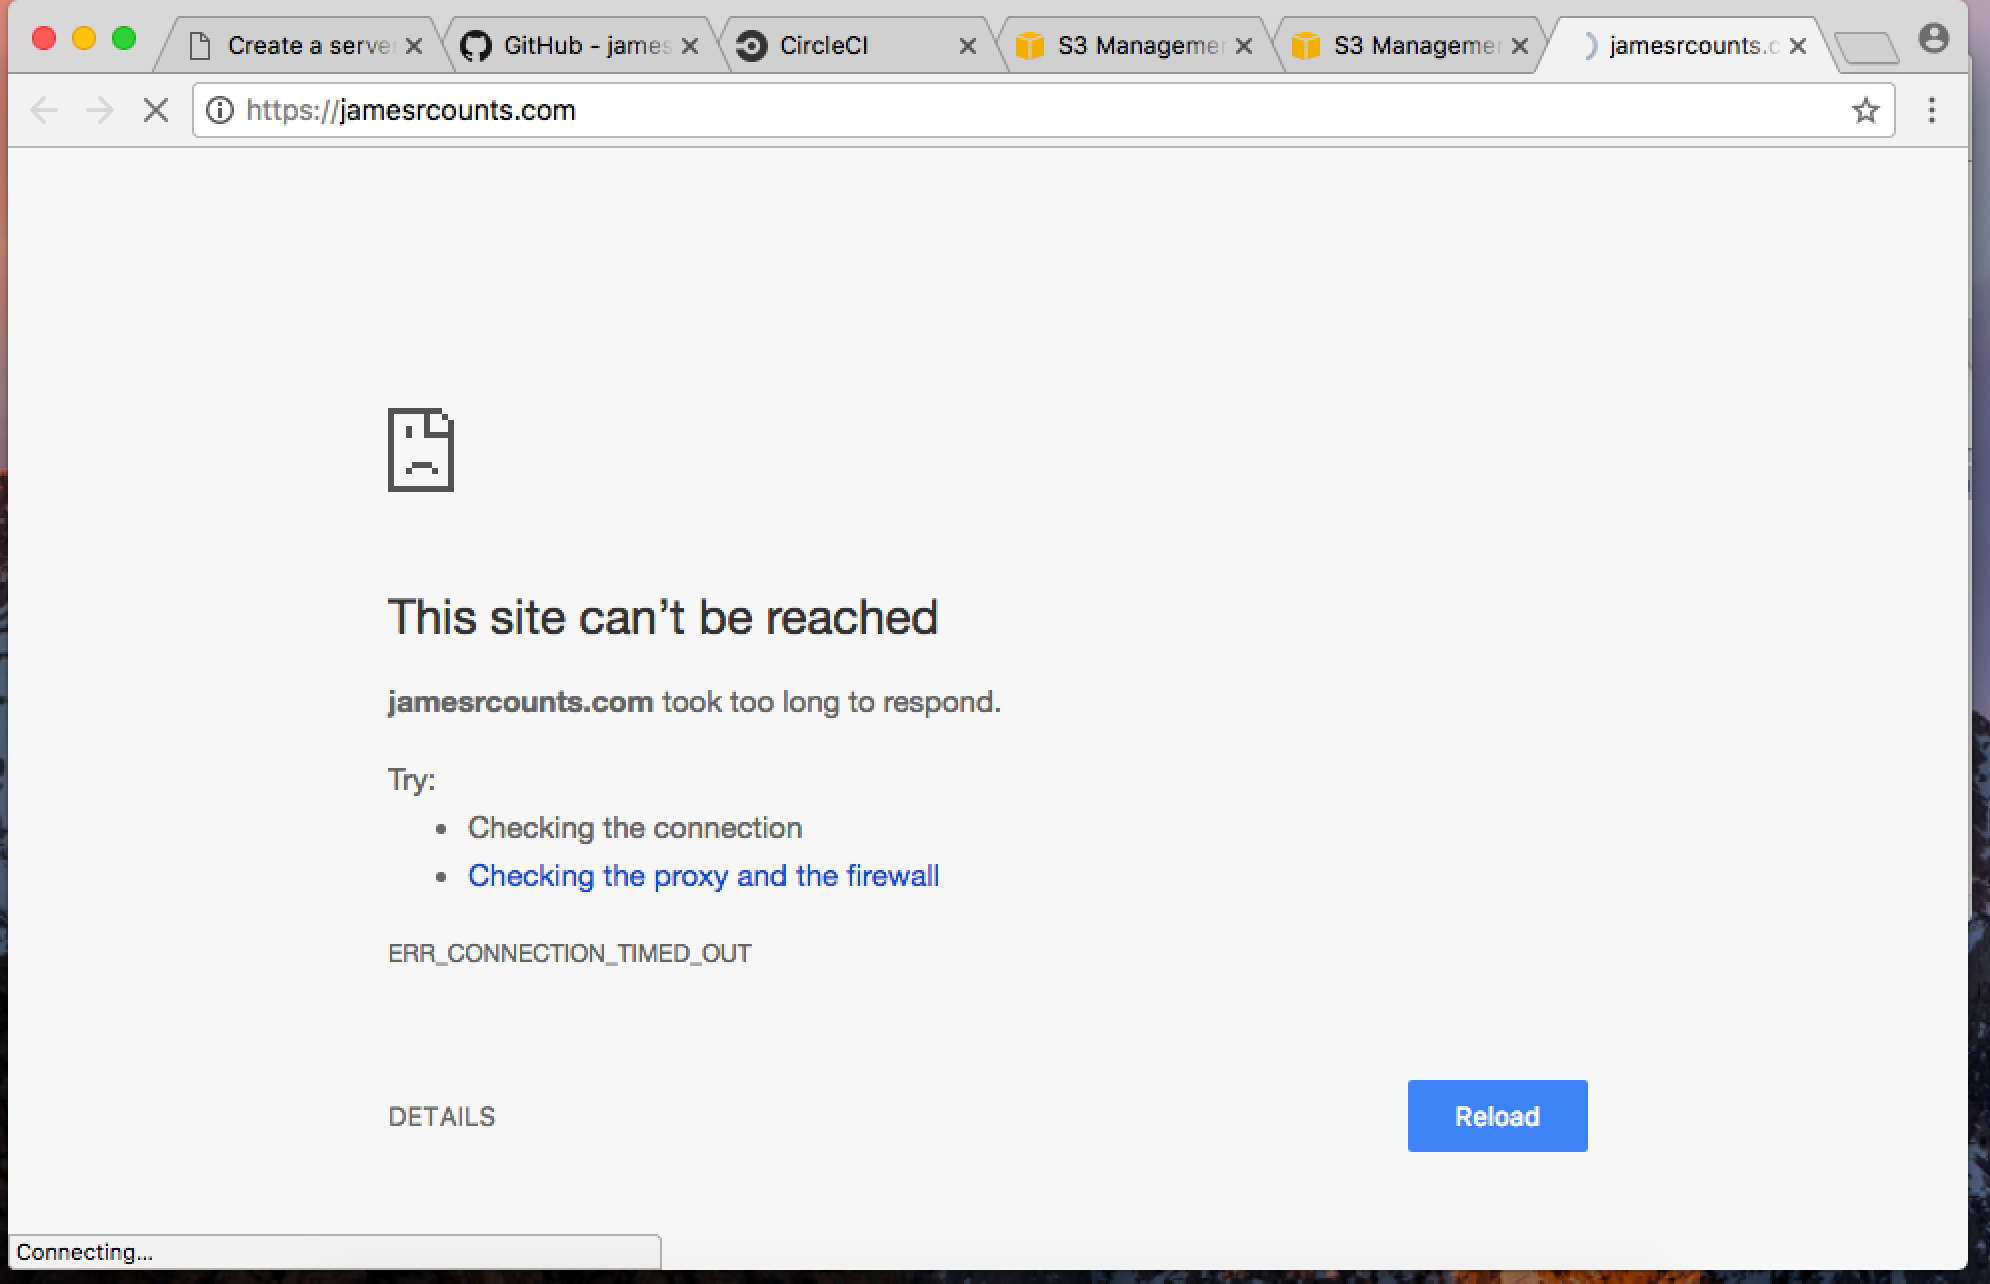
Setup Custom Domain
In this section, I’ll use Route53 to provide DNS service for my domain. You can skip this step if you only plan to use the default URL provided by AWS.
If you are following along with the Amazon documentation we’ve made it to here.
Do these tasks in your browser after logging into the AWS and navigating to Route53
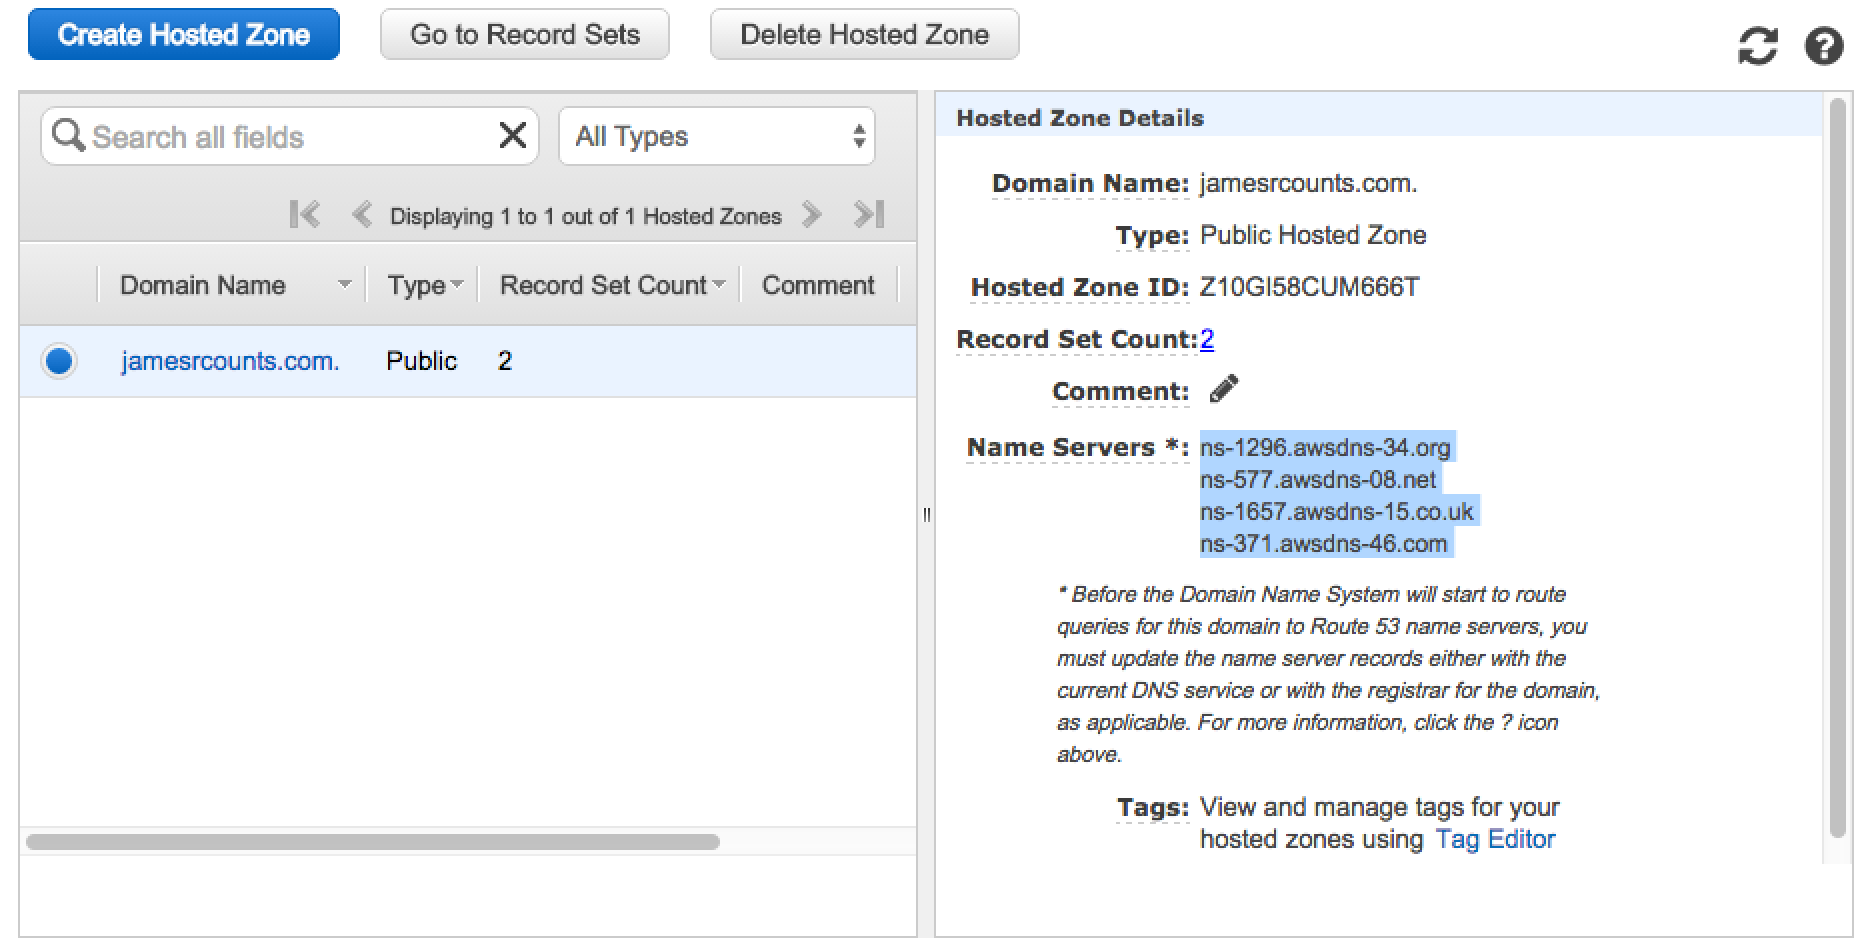
- Create a hosted zone - Instructions
- Enter the domain name, in my case:
jamesrcounts.com - Click “Create”
- Enter the domain name, in my case:
- Create alias record for the primary bucket
- Click “Create Record Set”
- Leave the “Name” field blank.
- Choose the “Yes” radio button next to the “Alias” label
-
Click in the “Alias Target” text box, and a drop-down should offer you the matching bucket as an option.
Note: If you do not see your bucket in the drop down, make sure your bucket name exactly matches the domain you are setting up. These must match for DNS setup to work. If the domain doesn’t match the bucket name, recreate your bucket with the correct name and try again.
-
Click “Create”

-
Create an alias for the secondary bucket
- Enter “www” as the name
- Configure the alias to point at the secondary bucket
-
Update DNS at the domain registrar
This step will vary depending on where you have your domain registered. You can even use Amazon as your registrar. I use hover.com, so I that’s what I’ll cover.
-
Visit the hosted zone and copy the collection of name servers.
-
I’ll log in to Hover, click on my domain and click the “Edit” button next to the nameservers

-
Paste in each name server into the record.

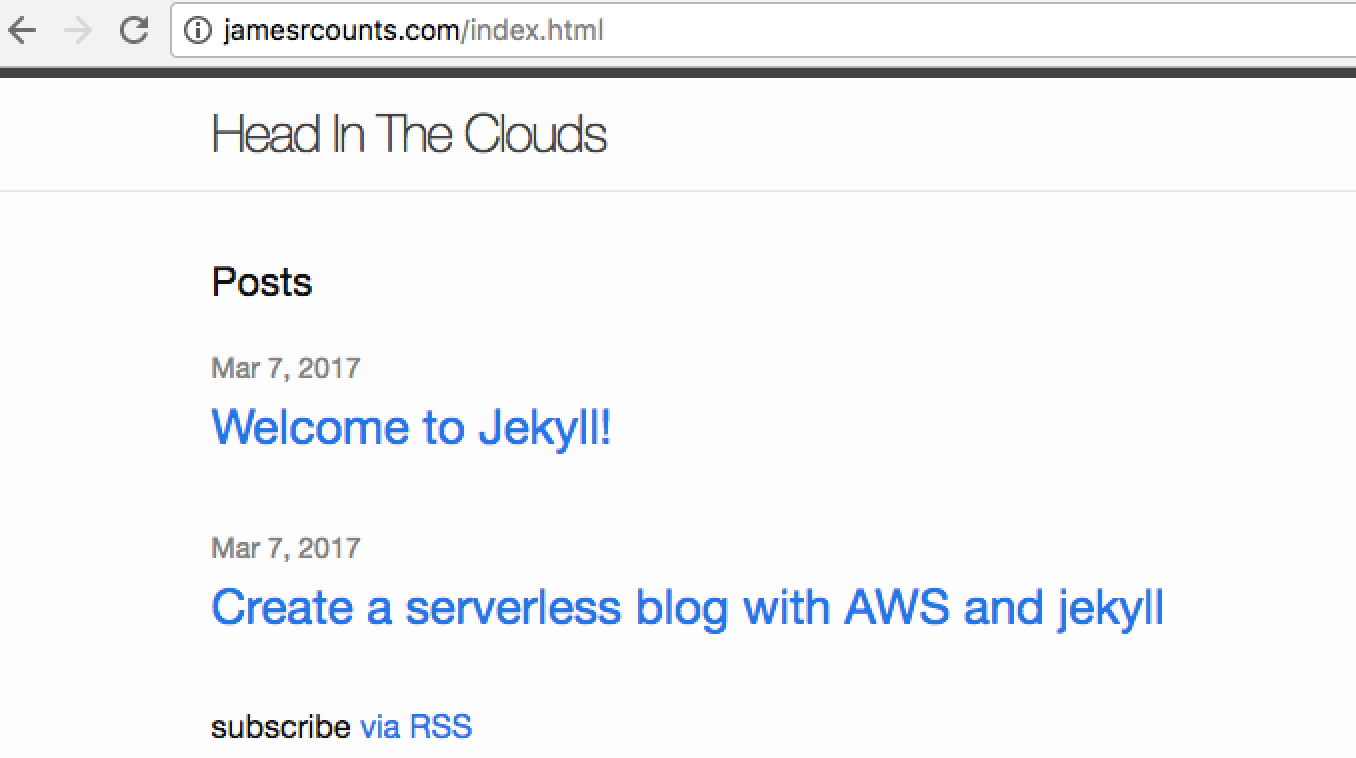
The standard disclaimer for DNS is always something like “it may take up to 24 hours for the change to propagate” so don’t be too surprised if the URL doesn’t resolve right away.
-
Once the DNS change has propagated, you will be able to reach your site home page at the custom domain.
-
Create IAM User for Site Deployment
To add/overwrite files in your S3 bucket, CircleCI needs access to the AWS account. I’ll create a specific user for this purpose, granting only the permissions needed to publish.
If you are unfamiliar with IAM, an IAM policy defines a set of rules to access resources in AWS and users are essentially just a set of credentials that can have these rules attached.
By default, AWS denies all access to resources. When a newly created user tries to access my primary S3 bucket, AWS will check for a policy that allows access to the bucket. AWS will deny the request unless I write a policy to allow access and attach it to the user. Earlier, we set up a bucket policy that allowed public read-only access to the primary bucket so that the bucket could serve web content to anyone. This policy would allow CircleCI to read the bucket. To perform writes and deletes, CircleCI will need additional permission.
Only when associated with polices do users become useful. You can apply a policy to a user by attaching it directly to the user, or by attaching it to a group that the user is in.
Perform these steps in your browser after logging in an navigating to the IAM console
-
Click “Policies”, then “Create Policy”
-
Click “Select” next to “Create Your Own Policy”
-
Fill out the policy information
-
I’ll use “Publish-jamesrcounts.com” as the name.
-
Description is optional, I’ll use the following:
Allows sync access to the jamesrcounts.com S3 bucket. -
Use a policy document similar to the following:
{ "Version": "2012-10-17", "Statement": [ { "Effect": "Allow", "Action": [ "s3:ListBucket" ], "Resource": [ "arn:aws:s3:::jamesrcounts.com" ] }, { "Effect": "Allow", "Action": [ "s3:PutObject", "s3:DeleteObject" ], "Resource": [ "arn:aws:s3:::jamesrcounts.com/*" ] } ] }Note: use your own bucket name in the ARNs
-
-
Click “Create Policy”
-
Next, click “Users” then click “Add user”
-
Give the user a name, I’ll use “Publisher-jamesrcounts.com”
-
Then select the checkbox next to “Programmatic access”
-
-
Click “Next: Permissions”
-
Click “Attach existing policies directly”, then select the checkbox next to “Publish-jamesrcounts.com”
-
Click “Next: Review”
-
Finally, click “Create user”
Important! Be sure to click the “Download .csv” button before moving on. This will be your only chance to download these keys.
Create CircleCI Pipeline
Now that I have published my site and it is available on my custom domain, I want to setup CircleCI to auto-publish new content.
The finish line for my new blog site is within reach. If you’re following along, we’re almost there.
Sign Up and Configure First Build
-
Start the setup process by clicking the green “Sign Up” button on the CircleCI home page.
Since my repository is on GitHub, I’ll link my GitHub account to CircleCI.
-
Deselect projects you don’t want to build
By default, CircleCI selects all the projects it can access through your linked GitHub account. You probably don’t want to build all of them.
-
Click “Deselect all projects” as needed.
You will need to do this once per organization/user.
-
Click the check box next to your blog repository.
-
-
Click the blue “Follow and Build” button below the list of projects.
-
CircleCI will kick off the first build.
We haven’t provided any instructions to CircleCI, so it will infer what it can by examining the repository. Once CircleCI sees the code and realizes that the jekyll site is a ruby based project, it will run
bundle install. This command will succeed but the build will show up as a failure because we haven’t configured any tests.More importantly, although CircleCI sees the “rubiness” of the project, it does not know that it should run jekyll to produce the site. I need to tell CircleCI to do so before it will create the outputs I need.

Create a circle.yml file
This configuration file tells CircleCI how to build and test our project. - Documentation
-
Create the circle.yml file in the project root. Run in your terminal at the project root:
touch circle.yml -
Next, configure the machine section with a specific ruby version.
This gets our feet wet with the
circle.ymlfile and resolves a warning duringbundle installon the build server.-
Figure out the version of ruby you are using locally by running this command in your terminal at the project root:
echo ${RUBY_VERSION}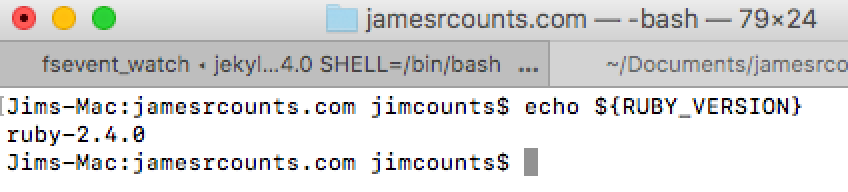
-
Add machine configuration to the top of the circle.yml file to tell CircleCI to use the same version.
  machine:
    ruby:
      version: ruby-2.4.0
-
-
Push this change and CircleCI will start a new build. The build will still fail because there are no testing instructions.
Setup jekyll build
Before we can setup tests we need something to test. Let’s tell CircleCI how to create the site.
-
Add a dependencies section below the machine section
dependencies: post: - bundle exec jekyll build -
Push and let CircleCI run, it may fail with an invalid date error like this:

-
Exclude problem file from jekyll build.
After seeing the error message in CircleCI, I tried to reproduce the error locally by running
bundle exec jekyll build. I couldn’t reproduce the error locally, and surfacing this kind of problem is one reason I like using build servers. A build server automatically involves a second machine in your delivery process, and that second machine often surfaces problems hidden by your local configuration.I searched the error message and found this github issue. The issue explains that the problem file not one of my files, it is actually a test file. The commenters on the issue recommend excluding files under the
vendor/bundlepath from the build.File exclusions are setup in
_config.yml, a file I haven’t touched yet. This file is in the project root directory and it contains several settings which impact improve the overall look and feel of the site. There are important items in the file, like the footer contents and site-wide title. I’ve been putting off updating these items to focus on writing this post. Now will be a good time to update these items while also fixing the problem withvendor/bundle. So you should read through this section, even if you don’t encounter the build error I saw.Open _config.yml and update these items:
-
title- This is the title for the whole site, your blog’s name in other words. Think of what you want to call your site. The first thing which occurs to me is “Head In The Clouds”, so I’ll call it that. -
email- add your email address here. This address will appear in the footer of every page. -
description- This description should be a short blurb describing your site. It will appear in the footer. -
twitter_username- Update this to reflect your twitter handle. -
github_username- Also update this to reflect your GitHub handle. -
exclude- Here we will add “vendor/bundle” to the list. We can also exclude “circle.yml” so that it won’t be copied to the _site directory.exclude: - Gemfile - Gemfile.lock - vendor/bundle - circle.yml
My final _config.yml file looks like this:
title: Head In The Clouds email: jamesrcounts@outlook.com description: > I'm Jim Counts, an independent consultant specializing in legacy code, cloud, and DevOps. This blog is where I'll share my thoughts and tips on cloud and serverless computing. baseurl: "" url: "" twitter_username: jamesrcounts github_username: jamesrcounts # Build settings markdown: kramdown theme: minima gems: - jekyll-feed exclude: - Gemfile - Gemfile.lock - vendor/bundle - circle.yml -
-
Push these changes and the next CircleCI build should finish without errors. I’m still missing tests and I need to resolve that to get a green build.
Setup Tests
Jekyll produces a static blog site, but there are still things to test. The jekyll docs recommend a tool called HTML Proofer to check for issues like badly formed HTML or broken links. - HTML Proofer
-
I’ll add a test block to my circle.yml
test: post: - bundle exec htmlproofer ./_site --check-html --disable-external -
I’ll add this line to end of my Gemfile
gem 'html-proofer' -
I’ll push these changes and the next CircleCI build is finally green!

Setup pre-commit hook
This part is optional (you can skip), but it is annoying to check something in, wait for the tests to run then find a simple error you could have fixed on your machine if you remembered to run html-proofer locally. So I’ll setup a git pre-commit hook to run jekyll build and html-proofer, and bring the failure closer to me in time and space.
Note: This hook will only run on the local repository, it will not automatically propagate to clones, and if you wipe your local repository and clone again, you will have to recreate the hook.
-
Create an executable script int the
.git/hooksfolder calledpre-commit- Documentationtouch .git/hooks/pre-commit chmod +x .git/hooks/pre-commit -
Open the file in your editor and add commands similar to those in your circle.yml file to create the script.
Note: This script also builds and tests drafts, so that I can resolve errors while the work is still in progress.
#!/bin/sh bundle exec jekyll build --drafts bundle exec htmlproofer ./_site --check-html --disable-external -
Test your work by committing a change
git commit -am "Added git pre-commit hook"
Configure Deployment
Now I have a working build. To finish things up I want the build output delivered to my S3 bucket so that my site will have the latest content added to it whenever I publish to GitHub. - Guide
-
Configure Secrets
-
Open the CSV you downloaded when you created your IAM user for CircleCI.
-
Click the gear next to your project name in the CircleCI dashboard.

-
Scroll down to permissions and click “AWS Permissions”.
-
Copy the Access Key ID and Secret Access Key from your CSV file into the appropriate fields here.
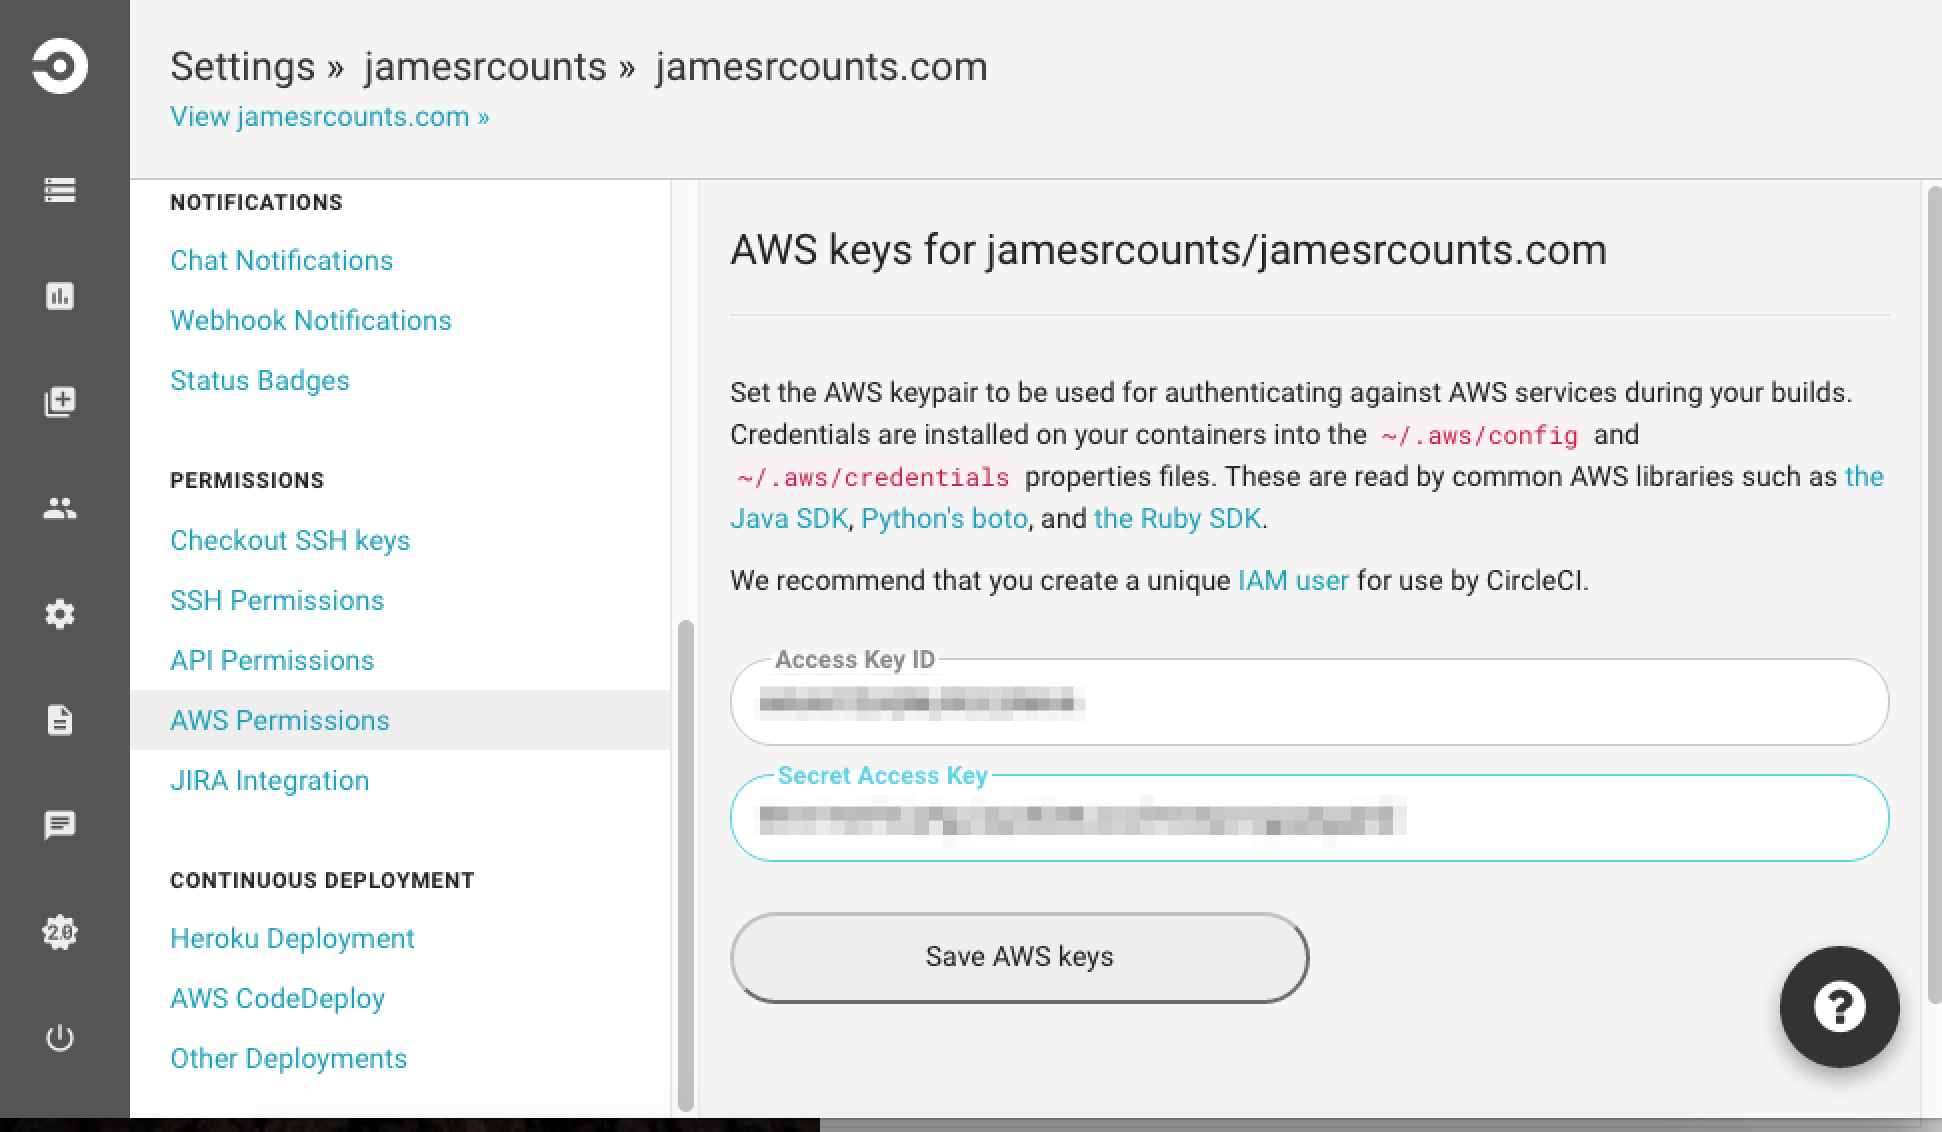
-
Click “Save AWS keys”.
-
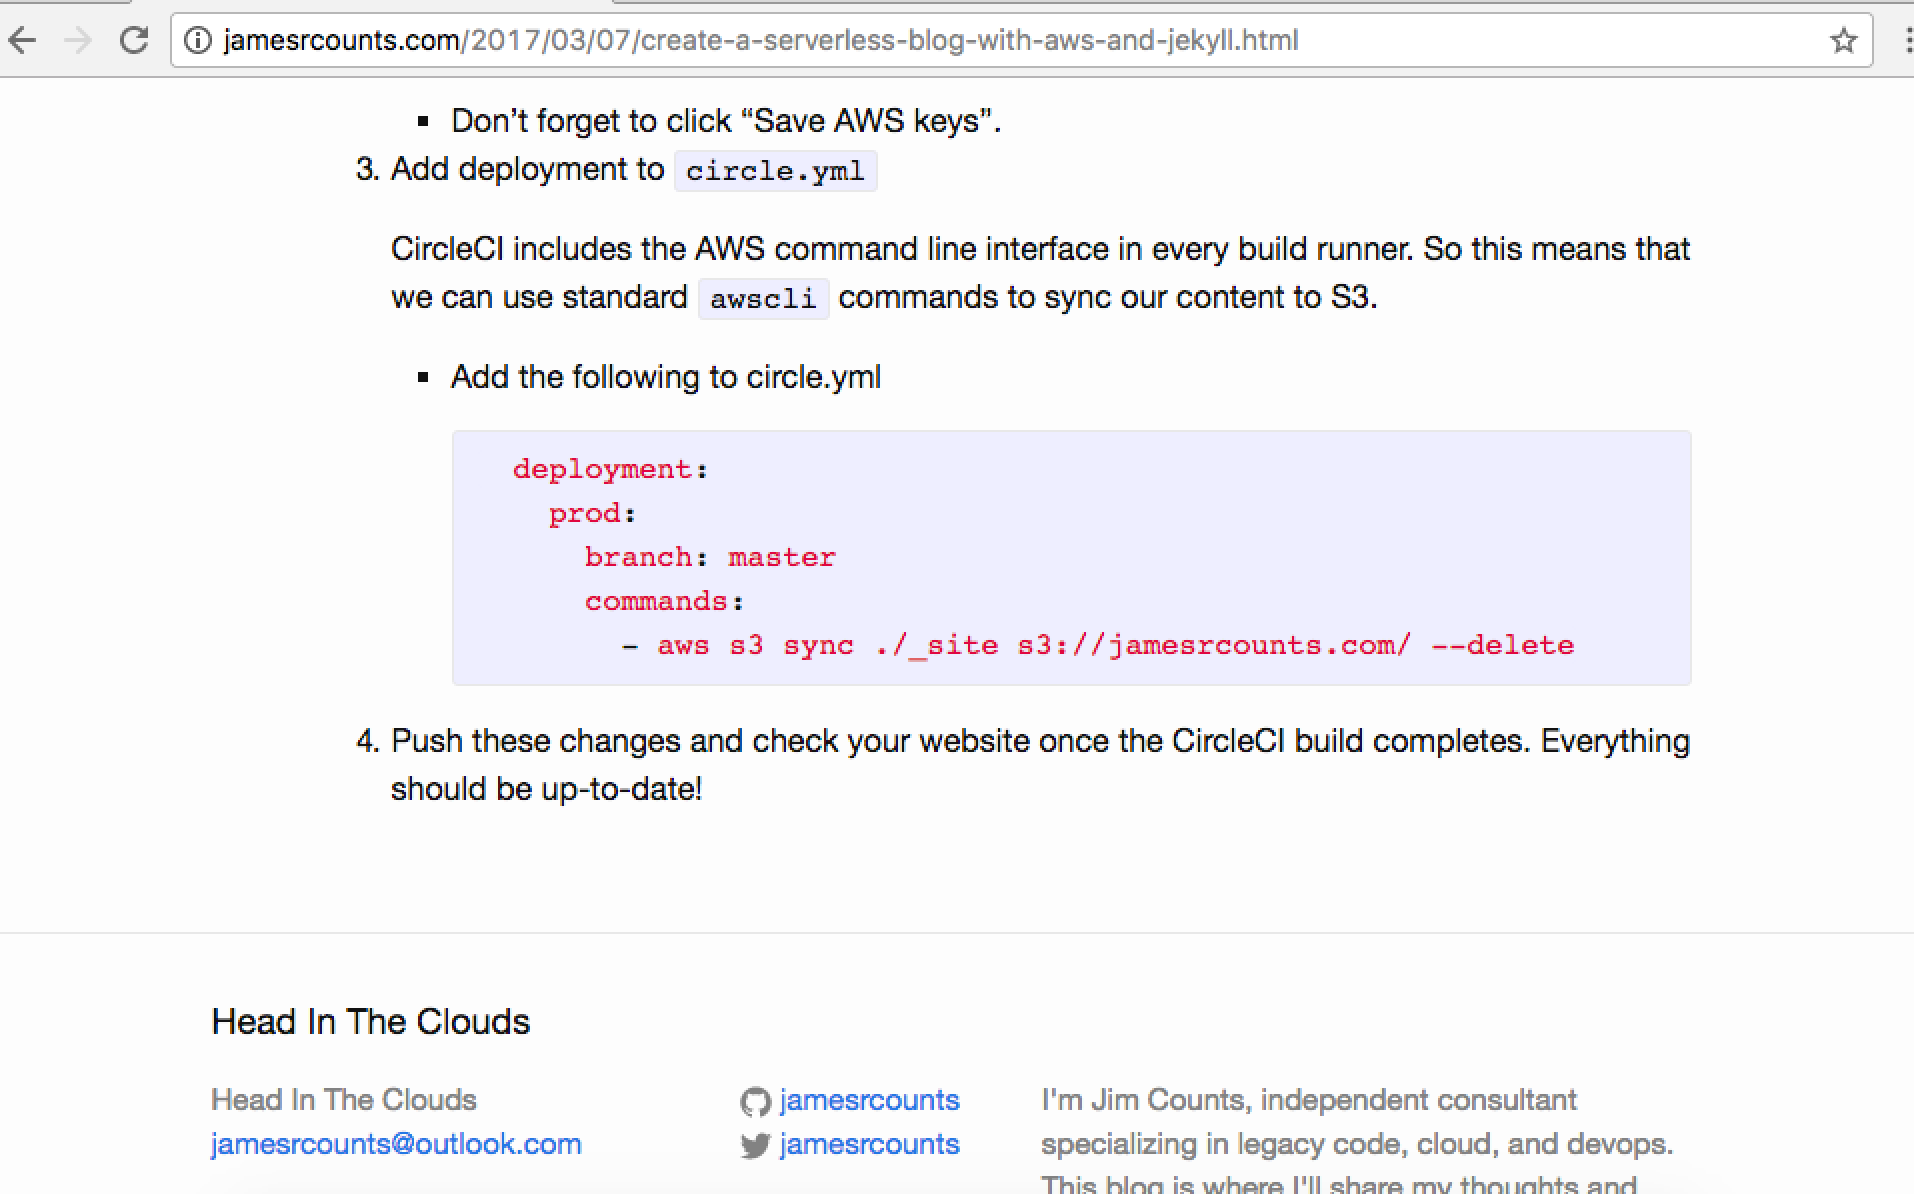
-
Add deployment to
circle.ymlCircleCI includes the AWS command line interface in every build runner. So this means that we can use standard
awsclicommands to sync our content to S3.-
Add the following to circle.yml
  deployment:
    prod:
      branch: master
      commands:
        - aws s3 sync ./_site s3://jamesrcounts.com/ --delete
-
-
Push these changes and check your website once the CircleCI build completes. Everything should be up-to-date!
-
Let’s make sure that CircleCI can also delete files.
-
Remove the sample post which jekyll generated.
rm _posts/2017-03-07-welcome-to-jekyll.markdown -
Commit and push this change.
-
Check the site and see that the sample post is gone!

-
Conclusion
In this post, I published the blog you are reading to AWS S3 and created a build pipeline to automatically publish new content using CircleCI. Now I’m ready to move forward and write new posts on a variety of tech topics.
For the most part, this series is done, but there are still revisit the blog in future posts. For example, I would like to enable HTTPS, but I left those steps out because this series was already getting to be pretty long. I would also like to set up a discussion/comment system.
For now, if you have any feedback, reach out through twitter or even email. Thanks for reading.