One Pipeline, One Lifecycle
- Initial Pipeline
- Separate Build and Deploy
- Separate Docker and Helm Builds
- Tying Everything Together
I often tell people that each Azure DevOps pipeline they create should “build one thing.” In practice, people tend to create a single pipeline to handle everything their application needs. I see pipelines that build infrastructure, compile applications, create docker images, and package helm charts, all in one. When I tell people to refactor these pipelines to “build one thing,” I mean that each pipeline should manage one lifecycle. If certain artifacts share the same lifecycle, they can go into the same pipeline. If the lifecycles are different, they should be separated.
An artifact’s lifecycle means “when should this artifact be built.” When all artifacts are in the same pipeline, they are all built when any of the sources change. Your source repository may include a folder for Terraform scripts, one for the helm chart definition, and several for your application source code. The “phippyandfriends” repository from my previous post is a good example. Suppose we have one pipeline for the “parrot” application, and I make a change to the Kubernetes cluster configuration in the Terraform script. When I run this (theoretical) pipeline, the pipeline picks up the Terraform changes as it should.
However, building the pipeline this way also unnecessarily rebuilds the parrot application. The parrot application should only rebuild when the .Net source code changes, and the infrastructure should only refresh when the Terraform scripts change. These two pieces of the solution are unlikely to change at the same time for the same reasons, and so they have different lifecycles.
In my previous post, I didn’t follow this guideline, and I created a single pipeline to produce a Docker image and a Helm chart. This post refactors that pipeline into three separate pipelines. The first pipeline builds the Docker image, the next builds the Helm chart, and the final pipeline handles deployment.
Initial Pipeline
Please take a look at the final pipeline from my earlier post on container pipelines. As you can see, the pipeline includes a build stage and a deploy stage:
However, in the build stage, we have two jobs, one to build the container image, and one to package the Helm chart. So there are a total of three lifecycles managed by this pipeline:
- The container image should only build when its content (the dotnet application) changes.
- The Helm package should only occur when the chart changes.
- The application should deploy when either artifact changes.

To make each pipeline manage just one lifecycle, we need three pipelines then. Also, to satisfy the requirements for the deployment pipeline’s lifecycle, we need to make the deployment pipeline trigger when either of the other pipelines complete. Attack this problem by first separating build and deployment pipelines, then break apart the container image build from the Helm chart build.
Separate Build and Deploy
As a first step, separate the deploy stage into a new pipeline. Do this by copying the “azure-pipelines.yml” as “azure-pipelines.deploy.yml.” Then remove the build stage from the deploy pipeline and the deploy stage from the build pipeline. The build pipeline needs a little cleanup to remove extra variables afterward, and the deploy pipeline needs additional setup to trigger when the build pipeline completes.
The most significant difference between the build pipeline and the original “complete” pipeline is that the new pipeline does not contain the stages to deploy to the development or production environments. This file is much shorter because those stages are gone now. Also, note that the trigger block now ignores changes to the new deploy pipeline. We have no reason to rebuild our container image or helm chart when the pipeline definition for deployment changes. This exclusion is our first example of where the lifecycles for the different pipelines diverge.
The remaining changes to the build pipeline relate to cleanup. The build pipeline jobs do not need the variables defining the AKS hosts. Other than an update to the Helm version and normalizing the NuGet package path variable name, removing the unnecessary variables were the only changes needed to clean up the build pipeline.
The deploy pipeline includes a new block: “resources.” This block defines any resource used by the pipeline created by a source other than the pipeline itself. In this case, the resource block creates a reference to the build pipeline. It indicates that the build pipeline triggers the deployment pipeline on completion. The deploy pipeline also triggers when the deployment YAML file changes, so this file is listed in the included trigger paths (rather than excluded as it was in the build pipeline).
Remember that this pipeline started as a copy of the original combined pipeline. The build stage is no longer needed, and the variables supporting those jobs are removable at this point. Instead, this pipeline includes a new variable: “imageTag.” The “imageTag” variable captures the “runName” variable from the pipeline resource that triggered the deploy pipeline. In the build pipeline, Azure DevOps used the run name (aka Build Number) to tag the container images when pushing to the Azure Container Registry. The deploy pipeline uses the same tag during Helm deployment to specify the correct image version.
As in the build pipeline, the remaining updates to the deployment pipeline are to support the upgrade to Helm 3.
Separate Docker and Helm Builds
The original build and deploy pipeline managed three lifecycles as one: docker image build, helm chart packaging, and deployment. The previous section separated deployment from builds. Next, I’ll decompose the build pipeline to manage docker image build and helm chart packaging lifecycles separately. As in the last section, start by copying the build pipeline YAML file to create “azure-pipelines.helm.yml.”
To update the pipeline to focus only on building Helm charts, update the trigger to only include the parrot “charts” folder, and the pipeline definition itself. Some people do not like to include the pipeline definition as a trigger. I find it more convenient because the first thing I usually want to do after updating the pipeline is to verify that the pipeline still works. The Helm packaging job does not build any dotnet code, so remove the variables related to release configuration and NuGet packages.
In the build stage, remove the “Docker” job entirely. The Helm job remains as the only job in the pipeline and should work without further modification.
Next, update the original build pipeline so that it no longer supports Helm.
Update the trigger exclusion paths to ignore changes to the Helm pipeline and the “charts” folder. Remove the Helm job. Rename the file to “azure-pipelines.docker.yml.” That’s it!
Tying Everything Together
This example starts with a single build pipeline that performs both build and deploy tasks. Now, with the pipeline broken up into several pieces, each dedicated to one lifecycle, Azure DevOps needs updating as well. Azure DevOps does not automatically detect new pipelines and does not run them unless we ask it to do so. Furthermore, Azure DevOps does not detect the rename from “azure-pipelines.yml” to “azure-pipelines.docker.yml.”
After committing the new pipeline definitions, visit the existing pipeline in Azure DevOps, and access the Settings.
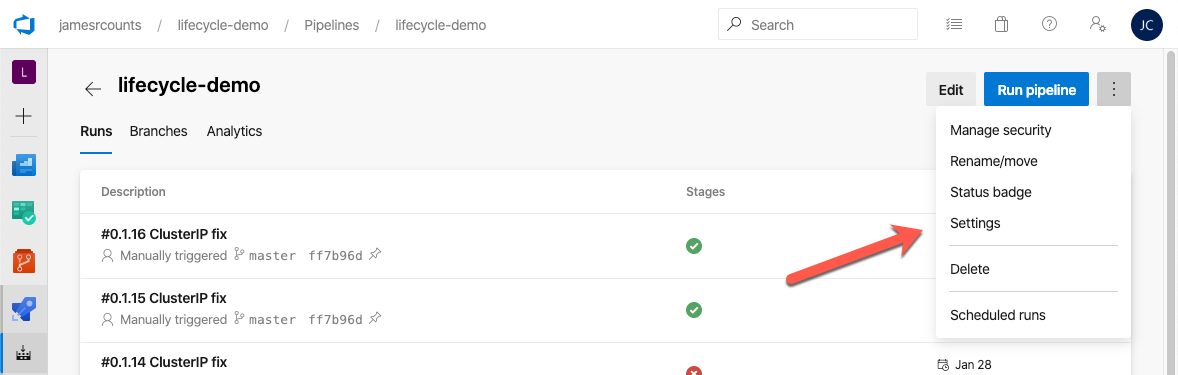
From settings, update the YAML file path setting to use the new name of the “original” build pipeline “azure-pipelines.docker.yml.”

To prevent confusion, update the pipeline display name in Azure DevOps. As the time of this writing, updating the display name can be tricky if you have certain preview features enabled (as I do). Start by selecting “Edit” on the pipeline view. Then select “Triggers” from the context menu.

The Triggers view brings up the “classic” pipeline editor, and you can edit the pipeline name to “lifecycle-demo-docker” directly on this screen.

Next, use the New Pipeline wizard to setup pipelines for the Helm build and the deploy pipeline. The docker and Helm pipelines should work right away, but the deploy pipeline shows an error.
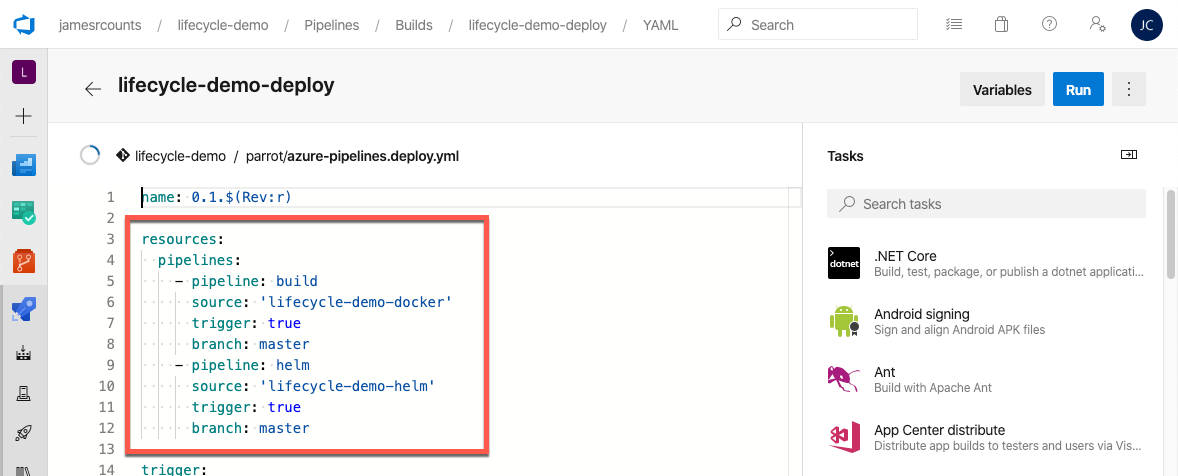
The deploy pipeline references the “original” build pipeline by its old name. To fix, update the pipeline resource for the docker build pipeline to reflect the new name, and add a resource for the helm pipeline.
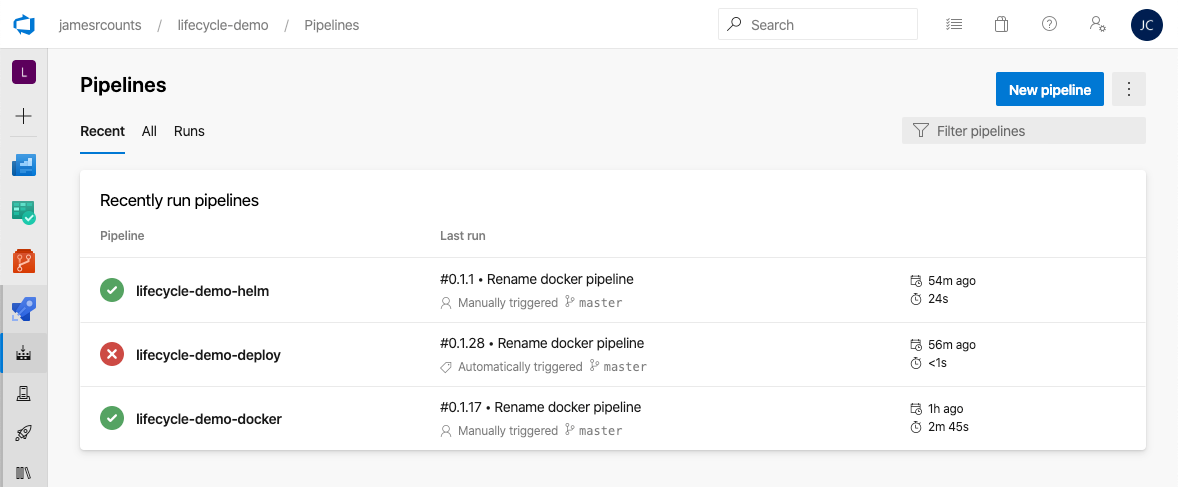
Finally, all pipelines are wired up and working as expected!

This article shows how to decompose a single pipeline into three pipelines that manage single lifecycles. Many smaller projects could get by without worrying about this, and many do. Some developers prefer having everything in one place and don’t want “too many” pipelines. However, for businesses where changing an artifact requires recertifying that artifact, pointlessly rebuilding artifacts that don’t change comes at a real cost. In my research, this was the only way I found in Azure DevOps to trigger the various builds separately. It would be nice if triggers could scope to individual stages rather than complete pipelines. This change would make it unnecessary to decompose the pipeline definition while still allowing us to manage each artifact lifecycle separately.